Sunday, September 29, 2013

Create Charts with jFreeChart

[caption id="attachment_924" align="aligncenter" width="377"] jFreeChart Demo jFreeChart Demo[/caption]

This tutorial is all about creating graphs. There are several tools for generating graphs without any hassle. Programming a graph from scratch might little be  tricky as it also deals with some graphics. Using a tool or library reduces the development time a lot. So we gonna use an OpenSource chart tool named jFreeChart for Java development.

Creating a graph with jFreeChart is just a matter of entering the required graph data and a little piece of code. Therefore, as the CodeZone4 norm I just go ahead with a 3D bar graph implementation using jFreeChart.

You can find source code for other types of graph on the internet.

First download required JARs from jFreeChart and add them in your project's classpath.

[sourcecode language="java"]
import org.jfree.chart.*;
import org.jfree.data.category.*;
import org.jfree.data.general.DefaultPieDataset;
import org.jfree.data.xy.*;
import org.jfree.data.*;
import org.jfree.chart.renderer.category.*;
import org.jfree.chart.plot.*;
import java.awt.*;

public class Main {

public static void main(String[] args) {
DefaultCategoryDataset dataset = new DefaultCategoryDataset();
dataset.setValue(3780, "A", "2008");
dataset.setValue(5000, "B", "2008");
dataset.setValue(6500, "A", "2009");
dataset.setValue(6000, "B", "2009");
dataset.setValue(9000, "A", "2010");
dataset.setValue(10000, "B", "2010");
JFreeChart chart = ChartFactory.createBarChart3D("Annual Income Analysis", "Year", "Income",
dataset, PlotOrientation.VERTICAL, true, true, false);
chart.setBackgroundPaint(Color.yellow);
chart.getTitle().setPaint(Color.blue);
CategoryPlot p = chart.getCategoryPlot();
p.setRangeGridlinePaint(Color.red);
ChartFrame frame1 = new ChartFrame("Income Data", chart);
frame1.setVisible(true);
frame1.setSize(300, 300);
}
}

[/sourcecode]

Sunday, September 15, 2013

Develop Voice Applications with VoiceXML

[caption id="attachment_915" align="alignnone" width="645"]voice xml voice xml[/caption]

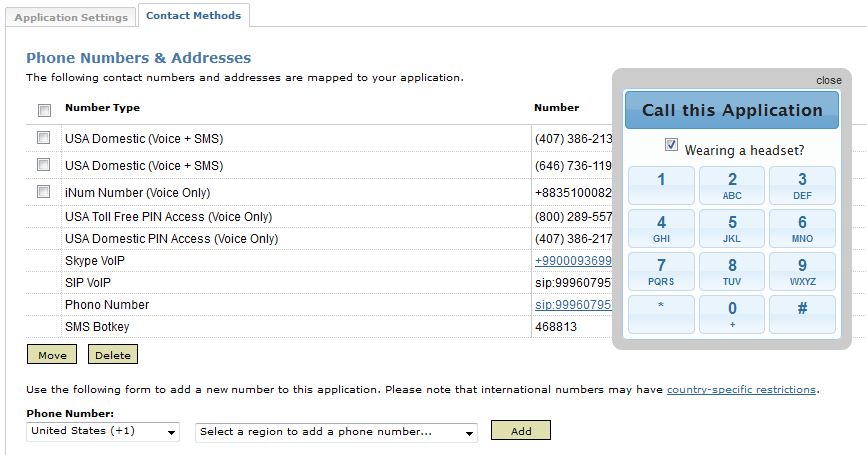
Web pages consist of HTML that is rendered into a visible page by a Web browser. Similarly, a voice application consists of XML (VoiceXML, CCXML, or CallXML) which becomes an interactive voice application when processed by the Voxeo Corporation VoiceCenter network. All you need to do is write the application's XML, map it to a phone number in the Voxeo Application Manager, and give it a call.

https://evolution.voxeo.com/

Sample vxml file

[sourcecode language="xml"]
<?xml version="1.0" encoding="UTF-8"?>
<vxml version="2.0" xmlns="http://www.w3.org/2001/vxml">

<form id="login">

<field name="phone_number" type="phone">
<prompt>Please say your complete phone number</prompt>
</field>

<field name="pin_code" type="digits">
<prompt>Please say your PIN code</prompt>
</field>

<block>
<submit next="http://www.example.com/servlet/login"
namelist="phone_number pin_code"/>
</block>

</form>
</vxml>
[/sourcecode]

Getting started with VoiceXML 2.0

Wednesday, September 11, 2013

Simple CRUD with MongoDB and PHP

[caption id="attachment_904" align="alignnone" width="645"]MongoDB MongoDB[/caption]

Today we gonna make our hands dirty with some MongoDB stuff. MongoDB is a no-SQL type, schema-less database. Such databases can be very useful in situations where there is much more user-generated content. You should understand where you use MongoDB or Apache CouchDB rather than traditional relational databases. You may want to google for getting more details about MongoDB if you gonna try this tutorial as a newbie.

First download and install MongoDB in your environment.

As we are trying this tutorial in PHP, you should download mongo driver for PHP also.

Edit php.ini so that it can load mongo driver. Add this line(in Windows)
<pre>extension=php_mongo.dll</pre>

Now we are good to go.

Run MongoDB server and start Mongo shell.

First you need to create a database and add a database user. If this is the first time you 're going to create a database user, first you need to create an admin user. Read documentation for more details.

This tutorial is all about a simple CRUD application using MongoDB. In this application a blog post scenario is used for demonstrating CRUD operations. This scenario is very popular in MongoDB Hello World tutorials.

This tutorial does not include complete source code. You can download it here.

DB class

[sourcecode language="php"]
class DB {

const DBHOST = 'localhost';
const DBUSER = 'codezone4';
const DBPWD = '123';
const DBPORT = 27017;
const DBNAME = 'blog_db';

private static $instance;
public $connection;
public $databse;

private function __construct() {
$connection_string = sprintf('mongodb://%s:%s@%s:%d/%s', DB::DBUSER, DB::DBPWD, DB::DBHOST, DB::DBPORT, DB::DBNAME);
try {
$this->connection = new Mongo($connection_string);
$this->databse = $this->connection->selectDB(DB::DBNAME);
} catch (MongoConnectionException $e) {
throw $e;
}
}

static public function instantiate(){
if(!isset(self::$instance)){
$class = __CLASS__;
self::$instance = new $class;
}
return self::$instance;
}

public function get_collection($name){
return $this->databse->selectCollection($name);
}

}
[/sourcecode]

Add New Post

[sourcecode language="php"]
include 'db.class.php';
if(isset($_POST['add_post'])){
$title = $_POST['title'];
$content = $_POST['content'];

if(!empty($title) && !empty($content)){

$mongo =  DB::instantiate();
$post_collection = $mongo->get_collection('posts');
$post = array(
'_id' => hash('sha1', time() . $title),
'title' => $title,
'content' => $content,
'created_on' => new MongoDate()
);
$post_id = $post_collection->insert($post,array('safe'=>TRUE));
header('Location:../dashboard.php');
}
}
[/sourcecode]

Monday, September 9, 2013

jQueryMobile with Google Map

[caption id="attachment_900" align="alignnone" width="336"]jQueryMobile with Google Map jQueryMobile with Google Map[/caption]

Demo

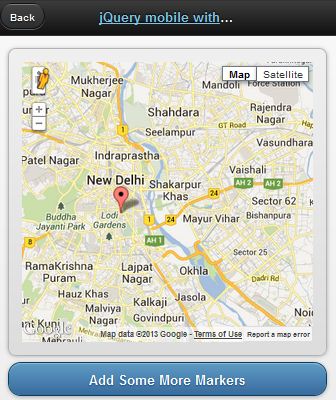
This demo is based on jQuery UI plugin for Google Maps.

[sourcecode language="javascript"]
<!doctype html>
<html lang="en">
<head>
<title>jQuery mobile with Google maps</title>
<link rel="stylesheet" href="http://code.jquery.com/mobile/1.2.0/jquery.mobile-1.2.0.min.css" />
<script src="http://code.jquery.com/jquery-1.8.2.min.js"></script>
<script src="http://code.jquery.com/mobile/1.2.0/jquery.mobile-1.2.0.min.js"></script>
<script type="text/javascript" src="http://maps.google.com/maps/api/js?v=3&sensor=false&language=en"> </script>
<script type="text/javascript" src="http://jquery-ui-map.googlecode.com/svn/trunk/ui/min/jquery.ui.map.min.js"></script>
<script type="text/javascript">

var colombo = new google.maps.LatLng(26.5727,73.8390);
var delhi = new google.maps.LatLng(28.6100,77.2300);
mobileDemo = { 'center': '28.6100,77.2300', 'zoom': 12 };

function initialize() {
$('#map_canvas').gmap({ 'center': mobileDemo.center, 'zoom': mobileDemo.zoom, 'disableDefaultUI':false });
$('#map_canvas').gmap('addMarker', { 'position': delhi } );
}

$(document).on("pageinit", "#basic-map", function() {
initialize();
});

$(document).on('click', '.add-markers', function(e) {
e.preventDefault();
$('#map_canvas').gmap('addMarker', { 'position': colombo } );
});
</script>
</head>
<body>
<div id="basic-map" data-role="page">
<div data-role="header">
<h1><a data-ajax="false" href="#">jQuery mobile with Google</a></h1>
<a data-rel="back">Back</a>
</div>
<div data-role="content">
<div style="padding:1em;">
<div id="map_canvas" style="height:350px;"></div>
</div>
<a href="#" data-role="button" data-theme="b">Add Some More Markers</a>
</div>
</div>
</body>
</html>
[/sourcecode]

Wednesday, September 4, 2013

Find Visitor's IP address in PHP

Relying on $_SERVER['REMOTE_ADDR'] to find your client's ip address is not always good. Looking for a wide solution?

Then use this function.

[sourcecode language="php"]
function get_ip() {
$ip = '';
if ($_SERVER['HTTP_CLIENT_IP'])
$ip = $_SERVER['HTTP_CLIENT_IP'];
else if($_SERVER['HTTP_X_FORWARDED_FOR'])
$ip = $_SERVER['HTTP_X_FORWARDED_FOR'];
else if($_SERVER['HTTP_X_FORWARDED'])
$ip = $_SERVER['HTTP_X_FORWARDED'];
else if($_SERVER['HTTP_FORWARDED_FOR'])
$ip = $_SERVER['HTTP_FORWARDED_FOR'];
else if($_SERVER['HTTP_FORWARDED'])
$ip = $_SERVER['HTTP_FORWARDED'];
else if($_SERVER['REMOTE_ADDR'])
$ip = $_SERVER['REMOTE_ADDR'];
else
$ip = '';

return $ip;
}
[/sourcecode]

Saturday, August 31, 2013

Sending Emails with Swift Mailer

"Swift Mailer integrates into any web app written in PHP 5, offering a flexible and elegant object-oriented approach to sending emails with a multitude of features."

Download Documentation

[sourcecode language="php"]
<!--?php require_once 'swiftmailer/lib/swift_required.php'; // Create the Transport //SMTP /*$transport = Swift_SmtpTransport::newInstance('smtp.example.org', 25) --->setUsername('your username')
->setPassword('your password')
;

*/

// Sendmail
//$transport = Swift_SendmailTransport::newInstance('/usr/sbin/sendmail -bs');

// Mail
$transport = Swift_MailTransport::newInstance();

// Create the Mailer using your created Transport
$mailer = Swift_Mailer::newInstance($transport);

// Create a message
$message = Swift_Message::newInstance('Wonderful Subject')
->setFrom(array('john@doe.com' => 'John Doe'))
->setTo(array('receiver@domain.org', 'other@domain.org' => 'A name'))
->setBody('Here is the message itself')
;

// Send the message
$result = $mailer->send($message);
?>

[/sourcecode]

Tuesday, August 27, 2013

jQuery UI Dialog with Custom Buttons

[caption id="attachment_883" align="alignnone" width="645"]jQuery UI Dialog jQuery UI Dialog[/caption]

[sourcecode language="javascript"]
<div id="dialog" title="Delete">
<p>Are you sure that you want to delete this division?</p>
</div>


$("#dialog").dialog({
modal: true,
resizable: false,
width: 800,
buttons: [{
text: "Yes",
click: function() {
alert("Clicked Yes");
}
},
{
text: "No",
click: function() {
$(this).dialog("close");
}
}]

});
[/sourcecode]

Sunday, August 11, 2013

HTML5 SQL Database Tutorial

[caption id="attachment_879" align="aligncenter" width="372"]HTML5 Data Storage HTML5 Data Storage[/caption]

HTML5 supports client side data storage. There are several types of storing data with HTML5

1. local storage through localStorage object

2. session storage through sessionStorage object

3. SQL based database

This tutorial demonstrates how to manage a client side SQL based database with HTML5.

Demo

[sourcecode language="html"]
<!DOCTYPE html>
<html>
<head>
<meta name=viewport content="user-scalable=no,width=device-width" />
<link rel="stylesheet" href="css/jquery.mobile-1.1.0.min.css" />
<script src="js/jquery-1.7.2.min.js"></script>
<script src="js/jquery.mobile-1.1.0.min.js"></script>
</head>
<body>
<div data-role=page id=home>
<div data-role=header>
<h1>Home</h1>
</div>

<div data-role="content">
<a href="#" data-role="button" id="create"> Create table </a>
<a href="#" data-role="button" id="remove"> Delete table </a>
<span> Item </span>
<input type="text" id="item">
<span> Quantity </span>
<input type="text" id="quantity">
<a href="#" data-role="button" id="insert">Insert item</a>
<a href="#" data-role="button" id="list">List items </a>

<ul data-inset="true" data-role="listview" id="itemlist"></ul>
</div>
</div>

<script>
var db = openDatabase ("itemDB", "1.0", "itemDB", 65535);
$("#create").bind ("click", function (e)
{
db.transaction (function (transaction)
{
var sql = "CREATE TABLE items " +
" (id INTEGER NOT NULL PRIMARY KEY AUTOINCREMENT, " +
"item VARCHAR(100) NOT NULL, " +
"quantity int(2) NOT NULL)"
transaction.executeSql (sql, undefined, function ()
{
alert ("Table created");
},error
);
});
});

$("#remove").bind ("click", function (e)
{
if (!confirm ("Delete table?", "")) return;;
db.transaction (function (transaction)
{
var sql = "DROP TABLE items";
transaction.executeSql (sql, undefined, success, error);
});
});

$("#insert").bind ("click", function (event)
{
var item = $("#item").val ();
var quantity = $("#quantity").val ();
db.transaction (function (transaction)
{
var sql = "INSERT INTO items (item, quantity) VALUES (?, ?)";
transaction.executeSql (sql, [item, quantity], function ()
{
alert ("Item created!");
}, error);
});
});

$("#list").bind ("click", function (event)
{
$("#itemlist").children().remove()
db.transaction (function (transaction)
{
var sql = "SELECT * FROM items";
transaction.executeSql (sql, undefined,
function (transaction, result)
{

if (result.rows.length)
{
for (var i = 0; i < result.rows.length; i++)
{
var row = result.rows.item (i);
var item = row.item;
var quantity = row.quantity;
$("#itemlist").append("<li>" + item + " - " + quantity + "</li>");
}
}
else
{
$("#itemlist").append("<li> No items </li>");
}
}, error);

});

});

function success ()
{
}

function error (transaction, err)
{
alert ("DB error : " + err.message);
return false;
}
</script>
</body>

</html>
[/sourcecode]

Please note that Firefox does not support this type of web SQL databases. If you try this in a FF browser, it will throw "ReferenceError: openDatabase is not defined".

Saturday, July 6, 2013

OpenLayers GeoJSON Vector Layer

[caption id="attachment_854" align="alignnone" width="602"]geojson Geojson[/caption]

Let's see how we can add a vector layer to OpenLayers map with the help of  GeoJSON response received from the server. Web Server can produce response in GML, GeoJSON, XML...etc after running a spatial query.
OpenLayers has Format classes for interpreting each kind of response.
This response consists of raw data which should be converted to features and added to a vector layer in order to render with OpenLayers.

[sourcecode language="javascript"]
var newLayer = new OpenLayers.Layer.Vector("Filtered by Zoom Level", {
strategies: [new OpenLayers.Strategy.BBOX(),
],

protocol: new OpenLayers.Protocol.HTTP({
url: "http://localhost/test/a.php?start=79.891119%207.078768&end=81.000609%207.940130&method=SPD",
format: new OpenLayers.Format.GeoJSON({
externalProjection: new OpenLayers.Projection("EPSG:4326"),
internalProject: new OpenLayers.Projection("EPSG:900913")
})
}),

//filter: filter,

// styleMap: styleMap,
format: new OpenLayers.Format.GeoJSON({
externalProjection: new OpenLayers.Projection("EPSG:4326"),
internalProject: new OpenLayers.Projection("EPSG:900913")
})

});
map.addLayers([newLayer]);
[/sourcecode]

Another Way

[sourcecode language="javascript"]
var newLayer = new OpenLayers.Layer.Vector("SPD", {
isBaseLayer: false,

styleMap: new OpenLayers.StyleMap({'default':{
strokeColor: "#F00",
strokeOpacity: 1,
strokeWidth: 2,
fillColor: "#FF5500",
fillOpacity: 0.5,
label : "${ad}",
fontSize: "8px",
fontFamily: "Courier New, monospace",
labelXOffset: "0.5",
labelYOffset: "0.5"
}})
});


OpenLayers.Request.GET({
url: "http://localhost/test/a.php?start=79.891119%207.078768&end=81.000609%207.940130&method=SPD",
headers: {'Accept':'application/json'},
success: function (req)
{
var g = new OpenLayers.Format.GeoJSON();
var feature_collection = g.read(req.responseText);
newLayer.destroyFeatures();
newLayer.addFeatures(feature_collection);
}
});
map.addLayers([newLayer]);
[/sourcecode]

Monday, June 24, 2013

How to split ul into multiple columns

[caption id="attachment_851" align="alignnone" width="308"]ul multi column ul multi column[/caption]

[sourcecode language="css"]
ul{
width: 300px;
overflow: hidden;
}

ul li{
float: left;
width: 75px;
}
[/sourcecode]

Tuesday, June 18, 2013

HTML Email with Codeigniter

[sourcecode language="php"]
$this->email->to( 'abc@gmail.com' );
$this->email->subject( 'Test' );
$this->email->message( $this->load->view( 'email/message', $data, true ) );
$this->email->send();
[/sourcecode]

How to enable CORS in Laravel 5

https://www.youtube.com/watch?v=PozYTvmgcVE 1. Add middleware php artisan make:middleware Cors return $next($request) ->header('Acces...