Sunday, March 31, 2013

How to use Order Statistic Filters with OpenCV

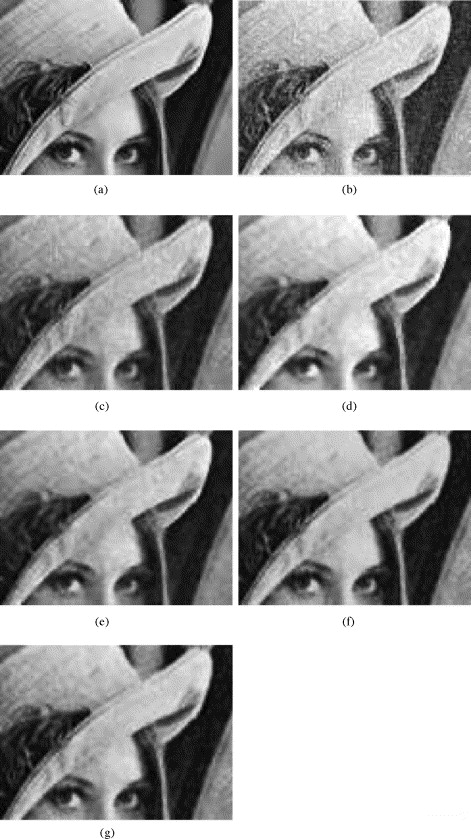
[caption id="attachment_789" align="alignnone" width="471"]Order Statistic Filters Order Statistic Filters[/caption]

Order Statistic filters are filters whose response is based on ordering/ranking the pixels
containing in the 3x3 window.
1. Median filter

The value of the centre pixel is replaced by the median value of its neighbourhood pixels. The median is taken after arranging the pixel values in ascending order and then taking the middle value. Use the following function,
void cvSmooth( const CvArr* src,
CvArr* dst,
int smoothtype=CV_MEDIAN,
int param1=3, int param2=3);

CV_MEDIAN (median blur) - finding median of param1×param1 neighborhood (the neighborhood is square).
2. Max filter
The max filter uses the maximum value of its neighbourhood pixels to replace the centre pixel value.
void cvDilate(const CvArr* src,
CvArr* dst,
IplConvKernel* element=NULL,
int iterations=1)

The function dilates the source image using the specified structuring element that determines the shape of a pixel neighborhood over which the maximum is taken. Image Understanding and Processing (OpenCV)

3. Minimum filter
The minimum filter uses the minimum value of its neighbourhood pixels to replace the centre pixel value.
void cvErode(const CvArr* src,
CvArr* dst,
IplConvKernel* element=NULL,
int iterations=1)

The function erodes the source image using the specified structuring element that determines the shape of a pixel neighborhood over which the minimum is taken.

Sample Code

[sourcecode language="cpp"]
#include "stdafx.h"
#include <cv.h>
#include <cxcore.h>
#include <highgui.h>

int _tmain(int argc, _TCHAR* argv[])
{

IplImage *img = cvLoadImage("apple noise.jpg");
IplImage *dst1=cvCreateImage(cvSize(img->width,img->height),8,3);

//cvSmooth(img,dst,CV_MEDIAN,3,3); Median Filter
//cvDilate(img,dst,NULL,1); Max Filter
//cvErode(img,dst,NULL,1); //Max FiltercvNamedWindow

cvNamedWindow("Image:");
cvShowImage("Image:", img);

cvNamedWindow("DST:");
cvShowImage("DST:", dst1);

cvWaitKey(0);

cvDestroyWindow("Image:");
cvReleaseImage(&img);

cvDestroyWindow("DST:");
cvReleaseImage(&dst1);

return 0;
}

[/sourcecode]

Wednesday, March 20, 2013

How to get TimeZone Offset in PHP

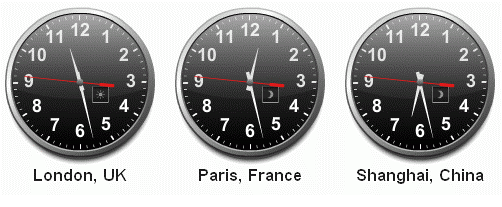
[caption id="attachment_768" align="alignnone" width="502"]timezone timezone[/caption]

[sourcecode language="php"]
function getOffsetByTimeZone($localTimeZone)
{
$time = new DateTime(date('Y-m-d H:i:s'), new DateTimeZone($localTimeZone));
$timezoneOffset = $time->format('P');
return $timezoneOffset;
}

[/sourcecode]

Call this function passing a local time zone as a string.
eg.
getOffsetByTimeZone('America/New_York');

Saturday, March 16, 2013

How to switch between Timezones in PHP

[caption id="attachment_768" align="alignnone" width="502"]timezone timezone[/caption]

[Extracted from : http://www.mindfiresolutions.com/PHP-function-for-Time-Zone-conversion-56.php]

Convert from GMT to a local timezone

[sourcecode language="php"]
function ConvertGMTToLocalTimezone($gmttime,$timezoneRequired)
{
$system_timezone = date_default_timezone_get();

date_default_timezone_set("GMT");
$gmt = date("Y-m-d h:i:s A");

$local_timezone = $timezoneRequired;
date_default_timezone_set($local_timezone);
$local = date("Y-m-d h:i:s A");

date_default_timezone_set($system_timezone);
$diff = (strtotime($local) - strtotime($gmt));

$date = new DateTime($gmttime);
$date->modify("+$diff seconds");
$timestamp = $date->format("Y-m-d h:i:s A");
return $timestamp;

}
[/sourcecode]

Convert from local timezone to GMT

[sourcecode language="php"]
function ConvertLocalTimezoneToGMT($gmttime,$timezoneRequired)
{
$system_timezone = date_default_timezone_get();

$local_timezone = $timezoneRequired;
date_default_timezone_set($local_timezone);
$local = date("Y-m-d h:i:s A");

date_default_timezone_set("GMT");
$gmt = date("Y-m-d h:i:s A");

date_default_timezone_set($system_timezone);
$diff = (strtotime($gmt) - strtotime($local));

$date = new DateTime($gmttime);
$date->modify("+$diff seconds");
$timestamp = $date->format("Y-m-d h:i:s A");
return $timestamp;
}

[/sourcecode]

Convert from one local timezone to another local timezone


[sourcecode language="php"]
function ConvertOneTimezoneToAnotherTimezone($time,$currentTimezone,$timezoneRequired)
{
$system_timezone = date_default_timezone_get();
$local_timezone = $currentTimezone;
date_default_timezone_set($local_timezone);
$local = date("Y-m-d h:i:s A");

date_default_timezone_set("GMT");
$gmt = date("Y-m-d h:i:s A");

$require_timezone = $timezoneRequired;
date_default_timezone_set($require_timezone);
$required = date("Y-m-d h:i:s A");

date_default_timezone_set($system_timezone);

$diff1 = (strtotime($gmt) - strtotime($local));
$diff2 = (strtotime($required) - strtotime($gmt));

$date = new DateTime($time);
$date->modify("+$diff1 seconds");
$date->modify("+$diff2 seconds");
$timestamp = $date->format("Y-m-d h:i:s A");
return $timestamp;
}
[/sourcecode]
[sourcecode language="php"]
echo ConvertGMTToLocalTimezone("2013-03-16 14:28:00","Asia/Seoul")."
";
echo ConvertLocalTimezoneToGMT("2013-03-16 14:28:00","Asia/Seoul")."
";
echo ConvertOneTimezoneToAnotherTimezone("2013-03-16 14:28:00","Asia/Seoul","Australia/South");
[/sourcecode]

Thursday, March 7, 2013

Python Email Crawler Class

[caption id="attachment_775" align="alignnone" width="202"]Email Crawler Email Crawler[/caption]

[sourcecode language="python"]
import os
import re

class EmailCrawler:
email_list = []
emailregex = re.compile('\w+[@][a-zA-Z_\.]+\.[a-zA-Z]{2,6}')
output_path = os.getcwd()

def setBaseURL(self,url):
self.tocrawl = set([url])

def run(self):
dir = raw_input('Enter the directory path for crawled files\n')
self.verifyDir(dir)
self.crawl(dir)

def output(self):
with open("emails.txt", "w") as a:
for email in self.email_list:
a.write(str(email) + os.linesep)
print email

def verifyDir(self,path):
if not os.path.exists(path):
print "This directory does not exist"
exit

def crawl(self,dir_path):
print "Crawling Email links in " + dir_path + "....\n\n"
for path, subdirs, files in os.walk(self.get_raw_string(dir_path)):
for filename in files:
filePath = os.path.join(path, filename)
f=open(filePath, 'r')
html=f.read()
f.close()
results = self.emailregex.findall(html)
if results:
for email in results:
if email not in self.email_list:
self.email_list.append(email)
self.output()

def get_raw_string(self,text):
"""Returns a raw string representation of text"""
escape_dict={'\a':r'\a',
'\b':r'\b',
'\c':r'\c',
'\f':r'\f',
'\n':r'\n',
'\r':r'\r',
'\t':r'\t',
'\v':r'\v',
'\'':r'\'',
'\"':r'\"'}

new_string=''
for char in text:
try:
new_string += escape_dict[char]
except KeyError:
new_string += char
return new_string

[/sourcecode]

How to run this email crawler?
Load and run this program in Python Shell. (In Python shell, Run >> Run Module)
import email_crawler
e = email_crawler.EmailCrawler()
e.run()

Python Web Crawler Class

[caption id="attachment_775" align="alignnone" width="202"]Web Crawler web crawler[/caption]

[sourcecode language="python"]
import sys
import re
import urllib2
import urlparse
import datetime
import os

class WebCrawler:
tocrawl = set([])
crawled = set([])
linkregex = re.compile('<a\s*href=[\'|"](.*?)[\'"].*?>')

def setBaseURL(self,url):
self.tocrawl = set([url])

def run(self):
url = raw_input('Enter an URL to crawl\n')
self.setBaseURL(url)
dir = raw_input('Where should I put crawled HTML source files?\n')
self.crawl(dir)

def getTitle(self,html):
startPos = html.find('<title>')
if startPos != -1:
endPos = html.find('</title>', startPos+7)
if endPos != -1:
title = html[startPos+7:endPos]
return title

def writeToFile(self,url):
with open('hyperlinks.txt', 'a') as file:
file.write(url + '\n')

def writeHTML(self,fileName,html,dirPath):
self.verifyDir(dirPath)
fileName = re.sub('[\\/:"*?<>|]',"",fileName)
with open(dirPath+'\\'+ fileName + '.txt', 'w+') as file:
file.write(html)

def verifyDir(self,path):
if not os.path.exists(path):
os.makedirs(path)

def crawl(self,dir_path):
while 1:
try:
if self.tocrawl:
crawling = self.tocrawl.pop()
print '\n\nStart Crawling - ' + crawling + '\n'
except KeyError:
raise StopIteration
url = urlparse.urlparse(crawling)
try:
response = urllib2.urlopen(crawling)
except:
continue
msg = response.read()
self.writeHTML(crawling,msg,dir_path)

#Display page title
print self.getTitle(msg)

links = self.linkregex.findall(msg)
self.crawled.add(crawling)
self.writeToFile(crawling)
for link in links:
if link.startswith('mailto'):
continue
if link.startswith('/'):
link = 'http://' + url[1] + link
elif link.startswith('#'):
link = 'http://' + url[1] + url[2] + link
elif not link.startswith('http'):
link = 'http://' + url[1] + '/' + link
if link not in self.crawled:
print '----' + link
self.tocrawl.add(link)

[/sourcecode]

How to run this crawler?

Run following command in Python shell.


import web_crawler
w = web_crawler.WebCrawler()
w.run()

Monday, March 4, 2013

Dealing with Time Zones in PHP/MySQL

[caption id="attachment_768" align="alignnone" width="502"]timezone timezone[/caption]

You might have experienced numerous problems when dealing with timezones. It is difficult to handle timezones when your web server and users are in different timezones. The condition become worse if the database server is in another timezone.

Let's see a simple way of storing date,time in database without messing up timezone related things. The datetime can be stored in GMT format without explicitly using a  specific timezone.

[sourcecode language="php"]
$gmtTime = gmdate("Y-m-d H:i:s", time());
[/sourcecode]

the timestamp value returned by time() function is stored in GMT format. This is neutral and can be stored in database without thinking timezone problems.

When querying data and make any date time comparisons you can convert it into a desired timezone using mysql built-in function CONVERT_TZ().

Following query can be used to retrive records added on a particular today with the consideration of a specific timezone.
This is based on 'America/Denver' timezone  ( -7:00).

[sourcecode language="php"]
SELECT *
FROM `audittrail`
WHERE date( CONVERT_TZ( datetime, '+0:00', '-7:00' ) ) = '2013-03-04 '

[/sourcecode]


Sunday, February 24, 2013

PHP Socket Programming Basics

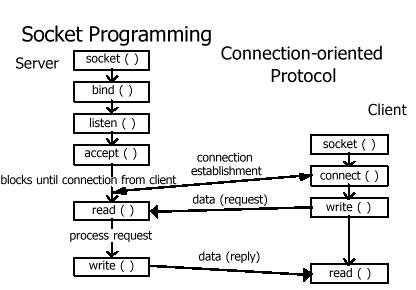
[caption id="attachment_764" align="aligncenter" width="416"]Socket Programming Socket Programming[/caption]

Welcome to Socket programming with PHP.

Before getting into this tutorial, you should know some bits about socket related network programming. If you know the theory  just skip this introduction.
To understand sockets, first think about client server architecture. The server is running one or more services and the clients thosewho require those services make requests to get those services. Clients can request a service from the server and get it only if there is a connection between them. In another way, server can listen for client requests and serve them if there 's a connection between them.
Then how a client can find a server on a network? On the internet each device is assigned a address called IP address to uniquely identify them. Therefore, if client knows the IP address of the server, he can find it. In the server, there may be multiple services running on different ports. So knowing only the IP address of the server does not help
reach the service. Client should know the exact port where the required service is running. Usually the server publishes its ports allocated for the services so that clients can connect. Most of them are under well-known ports which are in the range between 0 and 1023. While some ports are opened other ports are blocked for security concerns. Obviously port is a security hole where hackers might use for making a connection with the server

When combined  IP address with a port, it is a socket. A socket is one end-point of a two-way communication link between two programs running on the network.

There are two ways of socket programming in PHP. One is socket extension which is widely used and pretty common among PHP developers. PHP functions in this category starts with the prefix socket_ . The second method is using streams and these functions starts with stream_. In this tutorial we are using the first method as it's really simple.

The server read from the socket connection and read the message sent by client. The it writes the  reply to the socket connection and client gets the message from client's socket connection.

Creating the server

[sourcecode language="php"]
<?php
$host = "127.0.0.1";
$port = 25003;
$message = "Hello Client";
set_time_limit(0);
// create socket
$socket = socket_create(AF_INET, SOCK_STREAM, 0) or die("Could not create socket\n");
// bind socket to port
$result = socket_bind($socket, $host, $port) or die("Could not bind to socket\n");
// put server into passive state and listen for connections
$result = socket_listen($socket, 3) or die("Could not set up socket listener\n");

// accept incoming connections
$com = socket_accept($socket) or die("Could not accept incoming connection\n");
// read client input
$input = socket_read($com, 1024) or die("Could not read input\n");
// clean up input string
$input = trim($input);
echo "Client says: ".$input;
socket_write($com, $message , strlen ($message)) or die("Could not write output\n");
// close sockets
socket_close($com);
socket_close($socket);
?>
[/sourcecode]

Creating the client

[sourcecode language="php"]
<?php
$host    = "127.0.0.1";
$port    = 25003;
$message = "Hello Server";

// create socket
$socket = socket_create(AF_INET, SOCK_STREAM, 0) or die("Could not create socket\n");
// connect to server
$result = socket_connect($socket, $host, $port) or die ("Could not connect to server\n");
// send string to server
socket_write($socket, $message, strlen($message)) or die("Could not send data to server\n");
// get server response
$result = socket_read ($socket, 1024) or die("Could not read server response\n");
echo "Server  says :".$result;
// close socket
socket_close($socket);
?>


[/sourcecode]

Tuesday, February 12, 2013

Image Difference with OpenCV

[caption id="attachment_750" align="alignnone" width="216"]First Image First Image[/caption]

[caption id="attachment_751" align="alignnone" width="217"]Second Image Second Image[/caption]

[caption id="attachment_752" align="alignnone" width="215"]Image Difference Image Difference[/caption]

[sourcecode language="c"]
#include "stdafx.h"
#include<opencv\cv.h>
#include<opencv\cxcore.h>
#include<opencv\highgui.h>

int _tmain(int argc, _TCHAR* argv[])
{

IplImage *first = cvLoadImage("C:\\Users\\first.jpg");
IplImage *second = cvLoadImage("C:\\Users\\second.jpg");

IplImage *subImage;
subImage = cvCloneImage(first);

cvAbsDiff(first,second,subImage);
cvNamedWindow("Original:");
cvShowImage("Original:", first);

cvNamedWindow("Modified:");
cvShowImage("Modified:", second);

cvNamedWindow("Diff:");
cvShowImage("Diff:", subImage);

cvWaitKey(0);
cvDestroyWindow("Original:");
cvReleaseImage(&first);
cvDestroyWindow("Modified:");
cvReleaseImage(&second);
cvDestroyWindow("Diff:");
cvReleaseImage(&subImage);
return 0;

}

[/sourcecode]

Sunday, February 10, 2013

OpenCV Histogram Tutorial

Histogram is a graphical representation of the intensity distribution of an image.

[caption id="attachment_741" align="alignnone" width="291"]Original Image Original Image[/caption]

[caption id="attachment_742" align="alignnone" width="286"]Grayscale Image Grayscale Image[/caption]

[caption id="attachment_743" align="alignnone" width="289"]Histogram Histogram[/caption]

[sourcecode language="c"]
#include "stdafx.h"
#include<opencv\cv.h>
#include<opencv\cxcore.h>
#include<opencv\highgui.h>

int _tmain(int argc, _TCHAR* argv[])
{
IplImage *img = cvLoadImage("C:\\Users\\gamma.jpg");

IplImage *gray = cvCreateImage(cvSize(img->width,img->height),8,1);

cvCvtColor(img,gray,CV_RGB2GRAY);
cvNamedWindow("Image:",1);
cvShowImage("Image:", img);

cvNamedWindow("Gray:",1);
cvShowImage("Gray:", gray);

//create a rectangular area
CvRect rect = cvRect(0,0,500,600);
//CvRect rect = cvRect(x,y,width,height)

//apply the rectangular to the image and establish a region of interest
cvSetImageROI(gray,rect);
//gray=pointer to the image(gray pointer)
//rect=nameROI

float range[]={0,255};
float *ranges[]={range};
int hist_size = 256;

//create an image to hold the histogram
IplImage*histImage = cvCreateImage(cvSize(320,200),8,1);
//create a histogram to the information from the image
CvHistogram *hist = cvCreateHist(1,&hist_size,CV_HIST_ARRAY,ranges,1);
//1=no of dimentions
//&hist_size=size of dimention
//CV_HIST_ARRY=how to store data in histogram(multi dimentional array)
//ranges=ranges of values for dimention(0,255)
//1=uniform flag(sub intervals should be same)

//calculate the histogram
cvCalcHist(&gray,hist,0,NULL);
//&gray=source
//hist=pointer to the histogram
//0=accumilation flag(if set,hist is not clear at the begining)
//NULL=operational mask

float min_value,max_value=0;
int min_idx,max_idx=0;
//Grab Min/Max Values
cvGetMinMaxHistValue(hist,&min_value,&max_value,&min_idx,&max_idx);
//hist=pointer to the histogram

//Scale the bin values to fit to image representation
//remove higher values
cvScale(hist->bins, hist->bins,((double)histImage->height)/max_value,0);

//hist->bins=source to be scared
//hist->bins=destination
//use of same vales is manupilate source values and put them in the same location

//Set Up Factors For Visualization(set all histogram values to 255)
cvSet(histImage,cvScalarAll(255),0);
//create a factor for scaling along the width
int bin_w=cvRound((double)histImage->width/hist_size);

//draw the values
int i;
for(i=0;i<hist_size;i++)
{
//draw the histogram data on to the histogram image
cvRectangle(histImage,cvPoint(i*bin_w,histImage->height),cvPoint((i+1)*bin_w,histImage->height-cvRound(cvGetReal1D(hist->bins,i))),cvScalarAll(0),-1,8,0);
//cvScalarAll(0)=draw in black color
//-1=thickness of the line(filled rectangal)
//8=line type(connected)
//0=no of fractional points
}

cvNamedWindow("Histogram:",1);
cvShowImage("Histogram:", histImage);

cvWaitKey(0);
cvDestroyWindow("Image:");
cvReleaseImage(&img);

cvDestroyWindow("Gray:");
cvReleaseImage(&gray);

cvDestroyWindow("Histogram:");
cvReleaseImage(&histImage);

return 0;

}
[/sourcecode]

Thursday, February 7, 2013

Create Binary image using OpenCV

Welcome back, Today Let's see how to create a binary image using OpenCV library. Before start, we should have a color image(RGB) or grayscale image to make it binary.

For RGB images : RGB  => Grayscale => Binary

For Grayscale images : Grayscale => Binary

[sourcecode language="cpp"]

#include "stdafx.h"
#include<opencv\cv.h>
#include<opencv\cxcore.h>
#include<opencv\highgui.h>

int _tmain(int argc, _TCHAR* argv[])
{
IplImage *rgb = cvLoadImage("C:\\Users\\opencv3\\img\\opencv.png",1);
IplImage *gray = cvCreateImage(cvSize(rgb->width,rgb->height),8,1);

cvCvtColor(rgb,gray,CV_RGB2GRAY);//Change from RGB to GrayScale
IplImage *binary = cvCloneImage(gray);

cvNamedWindow("RGB:",1);
cvShowImage("RGB:",rgb);

cvNamedWindow("Grayscale:",1);
cvShowImage("Grayscale:",gray);

cvThreshold(gray,binary,80,255,CV_THRESH_BINARY);   //Change from Grayscale to Binary
cvNamedWindow("Binary:",1);
cvShowImage("Binary:",binary);

cvWaitKey(0);

cvDestroyWindow("RGB:");
cvReleaseImage(&rgb);
cvDestroyWindow("Grayscale:");
cvReleaseImage(&gray);
cvDestroyWindow("Binary:");
cvReleaseImage(&binary);
return 0;
}

[/sourcecode]


Tuesday, February 5, 2013

Create Grayscale image using OpenCV

[sourcecode language="cpp"]

#include "stdafx.h"
#include<opencv\cv.h>
#include<opencv\cxcore.h>
#include<opencv\highgui.h>

int _tmain(int argc, _TCHAR* argv[])
{
IplImage *src = cvLoadImage("C:\\Users\\opencv3\\img\\opencv.png",1);
IplImage *dest = cvCreateImage(cvSize(src->width,src->height),8,1);

cvNamedWindow("Original:",1);
cvShowImage("Original:",src);

cvCvtColor(src,dest,CV_RGB2GRAY);//Change from RGB to GrayScale
cvNamedWindow("Gray:",1);
cvShowImage("Gray:",dest);

cvWaitKey(0);

cvDestroyWindow("Original:");
cvReleaseImage(&src);
cvDestroyWindow("Gray:");
cvReleaseImage(&dest);
return 0;
}

[/sourcecode]

How to enable CORS in Laravel 5

https://www.youtube.com/watch?v=PozYTvmgcVE 1. Add middleware php artisan make:middleware Cors return $next($request) ->header('Acces...