"Swift Mailer integrates into any web app written in PHP 5, offering a flexible and elegant object-oriented approach to sending emails with a multitude of features."
Download Documentation
[sourcecode language="php"]
<!--?php require_once 'swiftmailer/lib/swift_required.php'; // Create the Transport //SMTP /*$transport = Swift_SmtpTransport::newInstance('smtp.example.org', 25) --->setUsername('your username')
->setPassword('your password')
;
*/
// Sendmail
//$transport = Swift_SendmailTransport::newInstance('/usr/sbin/sendmail -bs');
// Mail
$transport = Swift_MailTransport::newInstance();
// Create the Mailer using your created Transport
$mailer = Swift_Mailer::newInstance($transport);
// Create a message
$message = Swift_Message::newInstance('Wonderful Subject')
->setFrom(array('john@doe.com' => 'John Doe'))
->setTo(array('receiver@domain.org', 'other@domain.org' => 'A name'))
->setBody('Here is the message itself')
;
// Send the message
$result = $mailer->send($message);
?>
[/sourcecode]
Saturday, August 31, 2013

Tuesday, August 27, 2013
jQuery UI Dialog with Custom Buttons
[caption id="attachment_883" align="alignnone" width="645"] jQuery UI Dialog[/caption]
[sourcecode language="javascript"]
<div id="dialog" title="Delete">
<p>Are you sure that you want to delete this division?</p>
</div>
$("#dialog").dialog({
modal: true,
resizable: false,
width: 800,
buttons: [{
text: "Yes",
click: function() {
alert("Clicked Yes");
}
},
{
text: "No",
click: function() {
$(this).dialog("close");
}
}]
});
[/sourcecode]
 jQuery UI Dialog[/caption]
[sourcecode language="javascript"]
<div id="dialog" title="Delete">
<p>Are you sure that you want to delete this division?</p>
</div>
$("#dialog").dialog({
modal: true,
resizable: false,
width: 800,
buttons: [{
text: "Yes",
click: function() {
alert("Clicked Yes");
}
},
{
text: "No",
click: function() {
$(this).dialog("close");
}
}]
});
[/sourcecode]
Sunday, August 11, 2013
HTML5 SQL Database Tutorial
[caption id="attachment_879" align="aligncenter" width="372"] HTML5 Data Storage[/caption]
HTML5 supports client side data storage. There are several types of storing data with HTML5
1. local storage through localStorage object
2. session storage through sessionStorage object
3. SQL based database
This tutorial demonstrates how to manage a client side SQL based database with HTML5.
Demo
[sourcecode language="html"]
<!DOCTYPE html>
<html>
<head>
<meta name=viewport content="user-scalable=no,width=device-width" />
<link rel="stylesheet" href="css/jquery.mobile-1.1.0.min.css" />
<script src="js/jquery-1.7.2.min.js"></script>
<script src="js/jquery.mobile-1.1.0.min.js"></script>
</head>
<body>
<div data-role=page id=home>
<div data-role=header>
<h1>Home</h1>
</div>
<div data-role="content">
<a href="#" data-role="button" id="create"> Create table </a>
<a href="#" data-role="button" id="remove"> Delete table </a>
<span> Item </span>
<input type="text" id="item">
<span> Quantity </span>
<input type="text" id="quantity">
<a href="#" data-role="button" id="insert">Insert item</a>
<a href="#" data-role="button" id="list">List items </a>
<ul data-inset="true" data-role="listview" id="itemlist"></ul>
</div>
</div>
<script>
var db = openDatabase ("itemDB", "1.0", "itemDB", 65535);
$("#create").bind ("click", function (e)
{
db.transaction (function (transaction)
{
var sql = "CREATE TABLE items " +
" (id INTEGER NOT NULL PRIMARY KEY AUTOINCREMENT, " +
"item VARCHAR(100) NOT NULL, " +
"quantity int(2) NOT NULL)"
transaction.executeSql (sql, undefined, function ()
{
alert ("Table created");
},error
);
});
});
$("#remove").bind ("click", function (e)
{
if (!confirm ("Delete table?", "")) return;;
db.transaction (function (transaction)
{
var sql = "DROP TABLE items";
transaction.executeSql (sql, undefined, success, error);
});
});
$("#insert").bind ("click", function (event)
{
var item = $("#item").val ();
var quantity = $("#quantity").val ();
db.transaction (function (transaction)
{
var sql = "INSERT INTO items (item, quantity) VALUES (?, ?)";
transaction.executeSql (sql, [item, quantity], function ()
{
alert ("Item created!");
}, error);
});
});
$("#list").bind ("click", function (event)
{
$("#itemlist").children().remove()
db.transaction (function (transaction)
{
var sql = "SELECT * FROM items";
transaction.executeSql (sql, undefined,
function (transaction, result)
{
if (result.rows.length)
{
for (var i = 0; i < result.rows.length; i++)
{
var row = result.rows.item (i);
var item = row.item;
var quantity = row.quantity;
$("#itemlist").append("<li>" + item + " - " + quantity + "</li>");
}
}
else
{
$("#itemlist").append("<li> No items </li>");
}
}, error);
});
});
function success ()
{
}
function error (transaction, err)
{
alert ("DB error : " + err.message);
return false;
}
</script>
</body>
</html>
[/sourcecode]
Please note that Firefox does not support this type of web SQL databases. If you try this in a FF browser, it will throw "ReferenceError: openDatabase is not defined".
 HTML5 Data Storage[/caption]
HTML5 supports client side data storage. There are several types of storing data with HTML5
1. local storage through localStorage object
2. session storage through sessionStorage object
3. SQL based database
This tutorial demonstrates how to manage a client side SQL based database with HTML5.
Demo
[sourcecode language="html"]
<!DOCTYPE html>
<html>
<head>
<meta name=viewport content="user-scalable=no,width=device-width" />
<link rel="stylesheet" href="css/jquery.mobile-1.1.0.min.css" />
<script src="js/jquery-1.7.2.min.js"></script>
<script src="js/jquery.mobile-1.1.0.min.js"></script>
</head>
<body>
<div data-role=page id=home>
<div data-role=header>
<h1>Home</h1>
</div>
<div data-role="content">
<a href="#" data-role="button" id="create"> Create table </a>
<a href="#" data-role="button" id="remove"> Delete table </a>
<span> Item </span>
<input type="text" id="item">
<span> Quantity </span>
<input type="text" id="quantity">
<a href="#" data-role="button" id="insert">Insert item</a>
<a href="#" data-role="button" id="list">List items </a>
<ul data-inset="true" data-role="listview" id="itemlist"></ul>
</div>
</div>
<script>
var db = openDatabase ("itemDB", "1.0", "itemDB", 65535);
$("#create").bind ("click", function (e)
{
db.transaction (function (transaction)
{
var sql = "CREATE TABLE items " +
" (id INTEGER NOT NULL PRIMARY KEY AUTOINCREMENT, " +
"item VARCHAR(100) NOT NULL, " +
"quantity int(2) NOT NULL)"
transaction.executeSql (sql, undefined, function ()
{
alert ("Table created");
},error
);
});
});
$("#remove").bind ("click", function (e)
{
if (!confirm ("Delete table?", "")) return;;
db.transaction (function (transaction)
{
var sql = "DROP TABLE items";
transaction.executeSql (sql, undefined, success, error);
});
});
$("#insert").bind ("click", function (event)
{
var item = $("#item").val ();
var quantity = $("#quantity").val ();
db.transaction (function (transaction)
{
var sql = "INSERT INTO items (item, quantity) VALUES (?, ?)";
transaction.executeSql (sql, [item, quantity], function ()
{
alert ("Item created!");
}, error);
});
});
$("#list").bind ("click", function (event)
{
$("#itemlist").children().remove()
db.transaction (function (transaction)
{
var sql = "SELECT * FROM items";
transaction.executeSql (sql, undefined,
function (transaction, result)
{
if (result.rows.length)
{
for (var i = 0; i < result.rows.length; i++)
{
var row = result.rows.item (i);
var item = row.item;
var quantity = row.quantity;
$("#itemlist").append("<li>" + item + " - " + quantity + "</li>");
}
}
else
{
$("#itemlist").append("<li> No items </li>");
}
}, error);
});
});
function success ()
{
}
function error (transaction, err)
{
alert ("DB error : " + err.message);
return false;
}
</script>
</body>
</html>
[/sourcecode]
Please note that Firefox does not support this type of web SQL databases. If you try this in a FF browser, it will throw "ReferenceError: openDatabase is not defined".
Saturday, July 6, 2013
OpenLayers GeoJSON Vector Layer
[caption id="attachment_854" align="alignnone" width="602"] Geojson[/caption]
Let's see how we can add a vector layer to OpenLayers map with the help of GeoJSON response received from the server. Web Server can produce response in GML, GeoJSON, XML...etc after running a spatial query.
OpenLayers has Format classes for interpreting each kind of response.
This response consists of raw data which should be converted to features and added to a vector layer in order to render with OpenLayers.
[sourcecode language="javascript"]
var newLayer = new OpenLayers.Layer.Vector("Filtered by Zoom Level", {
strategies: [new OpenLayers.Strategy.BBOX(),
],
protocol: new OpenLayers.Protocol.HTTP({
url: "http://localhost/test/a.php?start=79.891119%207.078768&end=81.000609%207.940130&method=SPD",
format: new OpenLayers.Format.GeoJSON({
externalProjection: new OpenLayers.Projection("EPSG:4326"),
internalProject: new OpenLayers.Projection("EPSG:900913")
})
}),
//filter: filter,
// styleMap: styleMap,
format: new OpenLayers.Format.GeoJSON({
externalProjection: new OpenLayers.Projection("EPSG:4326"),
internalProject: new OpenLayers.Projection("EPSG:900913")
})
});
map.addLayers([newLayer]);
[/sourcecode]
Another Way
[sourcecode language="javascript"]
var newLayer = new OpenLayers.Layer.Vector("SPD", {
isBaseLayer: false,
styleMap: new OpenLayers.StyleMap({'default':{
strokeColor: "#F00",
strokeOpacity: 1,
strokeWidth: 2,
fillColor: "#FF5500",
fillOpacity: 0.5,
label : "${ad}",
fontSize: "8px",
fontFamily: "Courier New, monospace",
labelXOffset: "0.5",
labelYOffset: "0.5"
}})
});
OpenLayers.Request.GET({
url: "http://localhost/test/a.php?start=79.891119%207.078768&end=81.000609%207.940130&method=SPD",
headers: {'Accept':'application/json'},
success: function (req)
{
var g = new OpenLayers.Format.GeoJSON();
var feature_collection = g.read(req.responseText);
newLayer.destroyFeatures();
newLayer.addFeatures(feature_collection);
}
});
map.addLayers([newLayer]);
[/sourcecode]
 Geojson[/caption]
Let's see how we can add a vector layer to OpenLayers map with the help of GeoJSON response received from the server. Web Server can produce response in GML, GeoJSON, XML...etc after running a spatial query.
OpenLayers has Format classes for interpreting each kind of response.
This response consists of raw data which should be converted to features and added to a vector layer in order to render with OpenLayers.
[sourcecode language="javascript"]
var newLayer = new OpenLayers.Layer.Vector("Filtered by Zoom Level", {
strategies: [new OpenLayers.Strategy.BBOX(),
],
protocol: new OpenLayers.Protocol.HTTP({
url: "http://localhost/test/a.php?start=79.891119%207.078768&end=81.000609%207.940130&method=SPD",
format: new OpenLayers.Format.GeoJSON({
externalProjection: new OpenLayers.Projection("EPSG:4326"),
internalProject: new OpenLayers.Projection("EPSG:900913")
})
}),
//filter: filter,
// styleMap: styleMap,
format: new OpenLayers.Format.GeoJSON({
externalProjection: new OpenLayers.Projection("EPSG:4326"),
internalProject: new OpenLayers.Projection("EPSG:900913")
})
});
map.addLayers([newLayer]);
[/sourcecode]
Another Way
[sourcecode language="javascript"]
var newLayer = new OpenLayers.Layer.Vector("SPD", {
isBaseLayer: false,
styleMap: new OpenLayers.StyleMap({'default':{
strokeColor: "#F00",
strokeOpacity: 1,
strokeWidth: 2,
fillColor: "#FF5500",
fillOpacity: 0.5,
label : "${ad}",
fontSize: "8px",
fontFamily: "Courier New, monospace",
labelXOffset: "0.5",
labelYOffset: "0.5"
}})
});
OpenLayers.Request.GET({
url: "http://localhost/test/a.php?start=79.891119%207.078768&end=81.000609%207.940130&method=SPD",
headers: {'Accept':'application/json'},
success: function (req)
{
var g = new OpenLayers.Format.GeoJSON();
var feature_collection = g.read(req.responseText);
newLayer.destroyFeatures();
newLayer.addFeatures(feature_collection);
}
});
map.addLayers([newLayer]);
[/sourcecode]
Monday, June 24, 2013
How to split ul into multiple columns
[caption id="attachment_851" align="alignnone" width="308"] ul multi column[/caption]
[sourcecode language="css"]
ul{
width: 300px;
overflow: hidden;
}
ul li{
float: left;
width: 75px;
}
[/sourcecode]
 ul multi column[/caption]
[sourcecode language="css"]
ul{
width: 300px;
overflow: hidden;
}
ul li{
float: left;
width: 75px;
}
[/sourcecode]
Tuesday, June 18, 2013
HTML Email with Codeigniter
[sourcecode language="php"]
$this->email->to( 'abc@gmail.com' );
$this->email->subject( 'Test' );
$this->email->message( $this->load->view( 'email/message', $data, true ) );
$this->email->send();
[/sourcecode]
$this->email->to( 'abc@gmail.com' );
$this->email->subject( 'Test' );
$this->email->message( $this->load->view( 'email/message', $data, true ) );
$this->email->send();
[/sourcecode]
Monday, May 27, 2013
Codeigniter configuration for PostgreSQL Database
https://www.youtube.com/watch?v=fIu4TGBvZYo
First enable Postgresql extension in php.ini
extension=php_pgsql.dll
You also can enable Postgresql extension for PDO as well.
extension=php_pdo_pgsql.dll
If you forgot to enable this you may come across following error.
Now opendatabase configuration file. You should enter correct settings for connecting with your PostgreSQL database here.
Sample config file.
[sourcecode language="php"]
$db['default']['hostname'] = 'localhost';
$db['default']['username'] = 'postgres';
$db['default']['password'] = 'postgres';
$db['default']['database'] = 'abc_gis';
$db['default']['dbdriver'] = 'postgre';
$db['default']['dbprefix'] = '';
$db['default']['pconnect'] = TRUE;
$db['default']['db_debug'] = TRUE;
$db['default']['cache_on'] = FALSE;
$db['default']['cachedir'] = '';
$db['default']['char_set'] = 'utf8';
$db['default']['dbcollat'] = 'utf8_general_ci';
$db['default']['swap_pre'] = '';
$db['default']['autoinit'] = TRUE;
$db['default']['stricton'] = FALSE;
$db['default']['port'] = 5432;
[/sourcecode]
First enable Postgresql extension in php.ini
extension=php_pgsql.dll
You also can enable Postgresql extension for PDO as well.
extension=php_pdo_pgsql.dll
If you forgot to enable this you may come across following error.
A PHP Error was encountered

Severity: Warning

Message: require_once(C:/www/system/database/drivers/postgres/postgres_driver.php) [function.require-once]: failed to open stream: No such file or directory

Filename: database/DB.php

Line Number: 138
Now opendatabase configuration file. You should enter correct settings for connecting with your PostgreSQL database here.
Sample config file.
[sourcecode language="php"]
$db['default']['hostname'] = 'localhost';
$db['default']['username'] = 'postgres';
$db['default']['password'] = 'postgres';
$db['default']['database'] = 'abc_gis';
$db['default']['dbdriver'] = 'postgre';
$db['default']['dbprefix'] = '';
$db['default']['pconnect'] = TRUE;
$db['default']['db_debug'] = TRUE;
$db['default']['cache_on'] = FALSE;
$db['default']['cachedir'] = '';
$db['default']['char_set'] = 'utf8';
$db['default']['dbcollat'] = 'utf8_general_ci';
$db['default']['swap_pre'] = '';
$db['default']['autoinit'] = TRUE;
$db['default']['stricton'] = FALSE;
$db['default']['port'] = 5432;
[/sourcecode]
Sunday, May 19, 2013
Codeigniter Facebook Login Tutorial using Facebook PHP SDK

Demo
Download
Welcome to my new Codeigniter tutorial for Facebook Login. I assume that you are familar with Codeigniter framework before starting the tutorial. However, you can adopt the source code to use in native PHP application if you are not interested in CI. There is another alternative. Previously, I have published two posts related with Facebook Login. You can also refer those tutorials.
Facebook OAUTH dialog with new Graph API
AJAX Facebook Connect Demo
First you need to create a Facebook application.
Visit this link to create new app.
This is a straight-forward process.
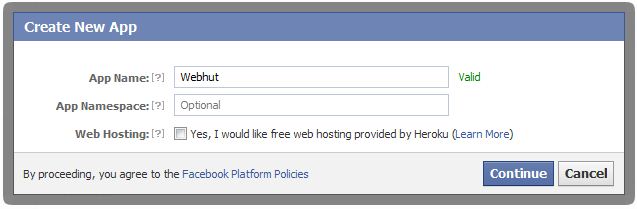
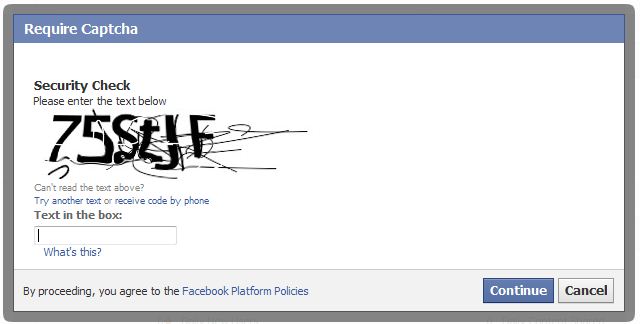
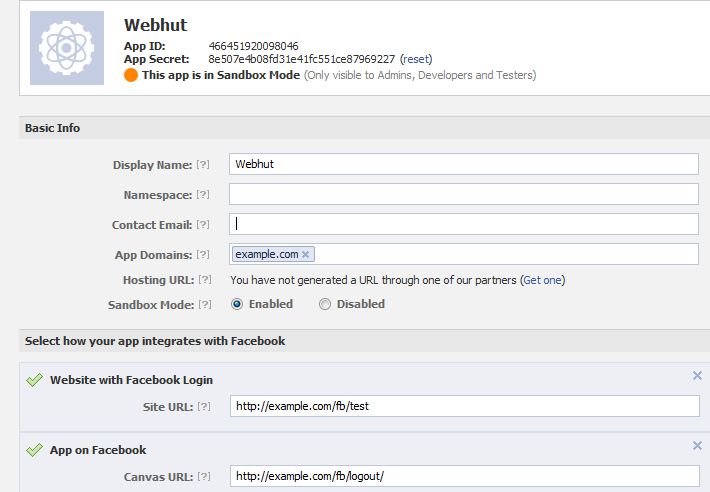
You need to get the App ID and App Secret of your application.
First create a config file to store App ID and App Secret.
config_facebook.php
[sourcecode language="php"]
$config['appID'] = '135042780009818';
$config['appSecret'] = 'c8786043eaf9339d28568520a18b2d2f';
[/sourcecode]
Add a controller that handles Facebook login and logout.
fb.php
[sourcecode language="php"]
<?php
if (!defined('BASEPATH'))
exit('No direct script access allowed');
//include the facebook.php from libraries directory
require_once APPPATH . 'libraries/facebook/facebook.php';
class Fb extends CI_Controller {
public function __construct() {
parent::__construct();
$this->config->load('config_facebook');
}
public function index() {
$this->load->view('head');
$this->load->view('fb');
$this->load->view('footer');
}
public function logout() {
$signed_request_cookie = 'fbsr_' . $this->config->item('appID');
setcookie($signed_request_cookie, '', time() - 3600, "/");
$this->session->sess_destroy(); //session destroy
redirect('/fb/index', 'refresh'); //redirect to the home page
}
public function fblogin() {
$facebook = new Facebook(array(
'appId' => $this->config->item('appID'),
'secret' => $this->config->item('appSecret'),
));
// We may or may not have this data based on whether the user is logged in.
// If we have a $user id here, it means we know the user is logged into
// Facebook, but we don't know if the access token is valid. An access
// token is invalid if the user logged out of Facebook.
$user = $facebook->getUser(); // Get the facebook user id
$profile = NULL;
$logout = NULL;
if ($user) {
try {
$profile = $facebook->api('/me'); //Get the facebook user profile data
$access_token = $facebook->getAccessToken();
$params = array('next' => base_url('fb/logout/'), 'access_token' => $access_token);
$logout = $facebook->getLogoutUrl($params);
} catch (FacebookApiException $e) {
error_log($e);
$user = NULL;
}
$data['user_id'] = $user;
$data['name'] = $profile['name'];
$data['logout'] = $logout;
$this->session->set_userdata($data);
redirect('/fb/test');
}
}
public function test() {
$this->load->view('test');
}
}
/* End of file fb.php */
/* Location: ./application/controllers/fb.php */
[/sourcecode]
In this tutorial, I'm using Facebook JavaScript SDK to load the oauth dialog. You need to add the App ID in following code to initiate the SDK successfully.
[sourcecode language="javascript"]
<img src="<?php echo base_url('assets/images/facebook.png');?>" id="facebook_login">
<script type="text/javascript">
window.fbAsyncInit = function() {
//Initiallize the facebook using the facebook javascript sdk
FB.init({
appId:'<?php $this->config->load('config_facebook'); echo $this->config->item('appID');?>',
cookie:true, // enable cookies to allow the server to access the session
status:true, // check login status
xfbml:true, // parse XFBML
oauth : true //enable Oauth
});
};
//Read the baseurl from the config.php file
(function(d){
var js, id = 'facebook-jssdk', ref = d.getElementsByTagName('script')[0];
if (d.getElementById(id)) {return;}
js = d.createElement('script'); js.id = id; js.async = true;
js.src = "//connect.facebook.net/en_US/all.js";
ref.parentNode.insertBefore(js, ref);
}(document));
//Onclick for fb login
$('#facebook_login').click(function(e) {
FB.login(function(response) {
if(response.authResponse) {
parent.location ='<?php echo base_url('fb/fblogin'); ?>'; //redirect uri after closing the facebook popup
}
},{scope: 'email,read_stream,publish_stream,user_birthday,user_location,user_work_history,user_hometown,user_photos'}); //permissions for facebook
});
</script>
[/sourcecode]
Monday, May 13, 2013
Reverse Geocoding with Google Map API
[caption id="attachment_833" align="alignnone" width="499"] Reverse Geocoding[/caption]
Demo
If you know the latitude and longitude of a particular location, you can get the relevant address details such as city, state, region, country...etc. This process is known as Reverse Geocoding. In this post I 'm gonna show you how this could be achieved with famous Google Map API. This entire post is based on one API request. Look at below code.
[sourcecode language="javascript"]
http://maps.googleapis.com/maps/api/geocode/json?latlng=-37.814251,144.963169&sensor=false
[/sourcecode]
Enter above line in the browser bar to see a whole bunch of location details for the geographical point (-37.814251,144.963169) in lat lng format.
Pretty Simple. Here I'm using Google Map JavaScript API V3. All you need to do is to parse the json response to extract the information whatever you need.
[sourcecode language="javascript"]
jQuery.ajax({
url: 'http://maps.googleapis.com/maps/api/geocode/json?latlng=-37.814251,144.963169&sensor=false',
type: 'POST',
dataType: 'json',
success: function(data) {
if(data.status == 'OK')
{
alert(data.results[1].formatted_address);
alert(data.results[1].address_components[0].long_name);
alert(data.results[1].address_components[1].long_name);
}
},
error: function(xhr, textStatus, errorThrown) {
alert("Unable to resolve your location");
}
});
[/sourcecode]
 Reverse Geocoding[/caption]
Demo
If you know the latitude and longitude of a particular location, you can get the relevant address details such as city, state, region, country...etc. This process is known as Reverse Geocoding. In this post I 'm gonna show you how this could be achieved with famous Google Map API. This entire post is based on one API request. Look at below code.
[sourcecode language="javascript"]
http://maps.googleapis.com/maps/api/geocode/json?latlng=-37.814251,144.963169&sensor=false
[/sourcecode]
Enter above line in the browser bar to see a whole bunch of location details for the geographical point (-37.814251,144.963169) in lat lng format.
Pretty Simple. Here I'm using Google Map JavaScript API V3. All you need to do is to parse the json response to extract the information whatever you need.
[sourcecode language="javascript"]
jQuery.ajax({
url: 'http://maps.googleapis.com/maps/api/geocode/json?latlng=-37.814251,144.963169&sensor=false',
type: 'POST',
dataType: 'json',
success: function(data) {
if(data.status == 'OK')
{
alert(data.results[1].formatted_address);
alert(data.results[1].address_components[0].long_name);
alert(data.results[1].address_components[1].long_name);
}
},
error: function(xhr, textStatus, errorThrown) {
alert("Unable to resolve your location");
}
});
[/sourcecode]
Wednesday, April 24, 2013
Google Map Street View
[caption id="attachment_826" align="alignnone" width="277"] Google Map Street View[/caption]
Demo
[sourcecode language="javascript"]
<!DOCTYPE html>
<html>
<head>
<meta charset="<a>utf-8</a>">
<title>Street View service</title>
<link href="<a href="view-source:https://google-developers.appspot.com/maps/documentation/javascript/examples/default.css">/maps/documentation/javascript/examples/default.css</a>" rel="<a>stylesheet</a>">
<script src="<a href="view-source:https://maps.googleapis.com/maps/api/js?v=3.exp&sensor=false">https://maps.googleapis.com/maps/api/js?v=3.exp&sensor=false</a>"></script>
<script>
function initialize() {
var fenway = new google.maps.LatLng(42.345573,-71.098326);
var mapOptions = {
center: fenway,
zoom: 14,
mapTypeId: google.maps.MapTypeId.ROADMAP
};
var map = new google.maps.Map(
document.getElementById('map-canvas'), mapOptions);
var panoramaOptions = {
position: fenway,
pov: {
heading: 34,
pitch: 10
}
};
var panorama = new google.maps.StreetViewPanorama(document.getElementById('pano'),panoramaOptions);
map.setStreetView(panorama);
}
google.maps.event.addDomListener(window, 'load', initialize);
</script>
</head>
<body>
<div id="<a>map-canvas</a>" style="<a>width: 400px; height: 300px</a>"></div>
<div id="<a>pano</a>" style="<a>position:absolute; left:410px; top: 8px; width: 400px; height: 300px;</a>"></div>
</body>
</html>
[/sourcecode]
 Google Map Street View[/caption]
Demo
[sourcecode language="javascript"]
<!DOCTYPE html>
<html>
<head>
<meta charset="<a>utf-8</a>">
<title>Street View service</title>
<link href="<a href="view-source:https://google-developers.appspot.com/maps/documentation/javascript/examples/default.css">/maps/documentation/javascript/examples/default.css</a>" rel="<a>stylesheet</a>">
<script src="<a href="view-source:https://maps.googleapis.com/maps/api/js?v=3.exp&sensor=false">https://maps.googleapis.com/maps/api/js?v=3.exp&sensor=false</a>"></script>
<script>
function initialize() {
var fenway = new google.maps.LatLng(42.345573,-71.098326);
var mapOptions = {
center: fenway,
zoom: 14,
mapTypeId: google.maps.MapTypeId.ROADMAP
};
var map = new google.maps.Map(
document.getElementById('map-canvas'), mapOptions);
var panoramaOptions = {
position: fenway,
pov: {
heading: 34,
pitch: 10
}
};
var panorama = new google.maps.StreetViewPanorama(document.getElementById('pano'),panoramaOptions);
map.setStreetView(panorama);
}
google.maps.event.addDomListener(window, 'load', initialize);
</script>
</head>
<body>
<div id="<a>map-canvas</a>" style="<a>width: 400px; height: 300px</a>"></div>
<div id="<a>pano</a>" style="<a>position:absolute; left:410px; top: 8px; width: 400px; height: 300px;</a>"></div>
</body>
</html>
[/sourcecode]
Saturday, April 20, 2013
Building ASP.NET MVC3 Applications
[caption id="attachment_811" align="aligncenter" width="255"] ASP.NET MVC3[/caption]
Welcome Back, today we gonna build a simple MVC application using ASP.net MVC3 template. The tutorial does not intend to teach you ASP.net MVC3 framework. There are so many resources on the internet that might help you getting started with this technology. So we focus on building a simple application using models, views, controllers, filters and other ASP.net specific things. Remember MVC is a design pattern and it can also be implemented in other programing languages like PHP.
Final result

Download Project
1. Creating New Project


2. Folder Structure

3. Changing the default controller.
You can change the default controller in Global.asax file by specifying the controller name and action method.

4. Adding Dojo files
We are using Dojo data grid for displaying data records. Therefore please download Dojo latest version and include them in Scripts folder.
5. Creating Book Modal
Right click on Models -> Add -> Class
Book.cs
[sourcecode language="csharp"]
using System;
using System.Collections.Generic;
using System.Linq;
using System.Web;
using System.ComponentModel.DataAnnotations;
namespace BooksApp.Models
{
public class Book
{
public int Id { get; set; }
[Required]
public string Name { get; set; }
[Required]
public string Author { get; set; }
[Required]
public float Price { get; set; }
}
}
[/sourcecode]
6. Creating BookFacade class
For a real application database operations can be placed in this class. For the sake of simplicity we omit mapping entity to database.
Right click on Models -> Add -> Class
BookFacade.cs
[sourcecode language="csharp"]
using System;
using System.Collections.Generic;
using System.Linq;
using System.Web;
using BooksApp.Models;
namespace BooksApp.Facade
{
public class BookFacade
{
public static List<Book> bookList { get; set; }
public static List<Book> GetBookList()
{
if (bookList == null)
{
bookList = new List<Book>();
for (int i = 0; i < 10; i++)
{
bookList.Add(new Book {Id = i, Name = "Book " + i, Author = "Author " + i, Price = i * 20 });
}
}
return bookList;
}
public static Book FindBook(int id)
{
var bookList = GetBookList();
return bookList.Find(x => x.Id == id);
}
public static void Add(Book book)
{
var bookList = GetBookList();
book.Id = bookList.Max(x => x.Id) + 1;
bookList.Add(book);
}
public static void Delete(int id)
{
var bookList = GetBookList();
Book book = bookList.Find(x => x.Id == id);
bookList.Remove(book);
}
}
}
[/sourcecode]
7. Creating BookController
Right click on Controllers-> Add -> Controller
BookController
[sourcecode language="csharp"]
using System;
using System.Collections.Generic;
using System.Linq;
using System.Web;
using System.Web.Mvc;
using BooksApp.Models;
using BooksApp.Facade;
using BooksApp.Filters;
namespace BooksApp.Controllers
{
public class BookController : Controller
{
//
// GET: /Book/
public ActionResult Index()
{
return View();
}
public ActionResult Create()
{
return View();
}
[AcceptVerbs(HttpVerbs.Post)]
public ActionResult Create(Book book)
{
if (book.Name.Length < 5)
{
ModelState.AddModelError("Book name", "Book name should have five or more characters.");
}
if (!ModelState.IsValid)
{
return View("Create",book);
}
BookFacade.Add(book);
return RedirectToAction("Index");
}
public ActionResult GetData(int id)
{
Book book = BookFacade.FindBook(id);
return View(book);
}
[RightChecker(AllowedBookIds = "5,6,7")]
public ActionResult Delete(int id)
{
Book book = BookFacade.FindBook(id);
if (book != null)
{
BookFacade.Delete(id);
}
return RedirectToAction("Index");
}
/////////////////////////AJAX/////////////////////////////
public ActionResult GetJSON()
{
return Json(BookFacade.GetBookList(), JsonRequestBehavior.AllowGet);
}
public ActionResult Ajax()
{
return View();
}
[AcceptVerbs(HttpVerbs.Post)]
public ActionResult Create_AJAX(Book book)
{
BookFacade.Add(book);
return new EmptyResult();
}
}
}
[/sourcecode]
Adding views
8. Adding Create View

[sourcecode anguage="csharp"]
<%@ Page Language="C#" Inherits="System.Web.Mvc.ViewPage<BooksApp.Models.Book>" %>
<!DOCTYPE html>
<html>
<head runat="server">
<title>Create</title>
</head>
<body>
<script src="<%: Url.Content("~/Scripts/jquery-1.5.1.min.js") %>" type="text/javascript"></script>
<script src="<%: Url.Content("~/Scripts/jquery.validate.min.js") %>" type="text/javascript"></script>
<script src="<%: Url.Content("~/Scripts/jquery.validate.unobtrusive.min.js") %>" type="text/javascript"></script>
<% using (Html.BeginForm("Create","Book")) { %>
<%: Html.ValidationSummary(true) %>
<fieldset>
<legend>Book</legend>
<div>
<%: Html.LabelFor(model => model.Name) %>
</div>
<div>
<%: Html.EditorFor(model => model.Name) %>
<%: Html.ValidationMessageFor(model => model.Name) %>
</div>
<div>
<%: Html.LabelFor(model => model.Author) %>
</div>
<div>
<%: Html.EditorFor(model => model.Author) %>
<%: Html.ValidationMessageFor(model => model.Author) %>
</div>
<div>
<%: Html.LabelFor(model => model.Price) %>
</div>
<div>
<%: Html.EditorFor(model => model.Price)%>
<%: Html.ValidationMessageFor(model => model.Price)%>
</div>
<p>
<input type="submit" value="Create" />
</p>
</fieldset>
<% } %>
<div>
<%: Html.ActionLink("Back to List", "Index") %>
</div>
</body>
</html>
[/sourcecode]
9. Adding GetData View

[sourcecode language="csharp"]
<%@ Page Language="C#" Inherits="System.Web.Mvc.ViewPage<BooksApp.Models.Book>" %>
<!DOCTYPE html>
<html>
<head runat="server">
<title>Book Details</title>
</head>
<body>
<fieldset>
<legend>Book</legend>
<div>Name</div>
<div>
<%: Html.DisplayFor(model => model.Name) %>
</div>
<div>Author</div>
<div>
<%: Html.DisplayFor(model => model.Author) %>
</div>
<div>Price</div>
<div>
<%: Html.DisplayFor(model => model.Price) %>
</div>
</fieldset>
<p>
<%: Html.ActionLink("Edit", "Edit", new { id=Model.Id }) %> |
<%: Html.ActionLink("Back to List", "Index") %>
</p>
</body>
</html>
[/sourcecode]
10. Adding Index View
[sourcecode language="csharp"]
<%@ Page Language="C#" Inherits="System.Web.Mvc.ViewPage<dynamic>" %>
<!DOCTYPE html>
<html>
<head runat="server">
<title>Index</title>
<style type="text/css">
@import "../../Scripts/dojo/dijit/themes/dijit.css";
@import "../../Scripts/dojo/dojox/grid/resources/Grid.css";
@import "../../Scripts/dojo/dojox/grid/resources/tundraGrid.css";
@import "../../Scripts/dojo/dijit/themes/tundra/tundra.css";
</style>
<script type="text/javascript" src="../../Scripts/dojo/dojo/dojo.js"
djconfig="isDebug:false, debugAtAllCosts:false"></script>
<script src="../../Scripts/dojo/dijit/dijit.js" type="text/javascript"></script>
<script language="javascript" type="text/javascript">
dojo.require("dojox.grid.DataGrid");
dojo.require("dojo.data.ItemFileWriteStore");
dojo.ready(function () {
DisplayAll();
});
function DisplayAll() {
var that = this;
// The parameters to pass to xhrGet, the url, how to handle it, and the callbacks.
var xhrArgs = {
url: "../Book/GetJSON",
handleAs: "json",
preventCache: true,
load: function (data, ioargs) {
that.PopulateGrid(data); //This will populate the grid
},
error: function (error, ioargs) {
alert(ioargs.xhr.status);
}
}
// Call the asynchronous xhrGet
dojo.xhrGet(xhrArgs);
}
function PopulateGrid(store) {
var jsonString = "{identifier: \"Id\", items: " + dojo.toJson(store) + "}"; //Creates the Json data that supports the grid structure. The identifier value should be unique or errors will be thrown
var dataStore = new dojo.data.ItemFileReadStore({ data: dojo.fromJson(jsonString) }); //Converts it back to an object and set it as the store
/*set up layout of the grid that will be columns*/
var gridStructure = [
{ field: 'Id', name: 'Book Id', styles: 'text-align: center;', width: 20 },
{ field: 'Name', name: 'Name', width: 20 },
{ field: 'Author', name: 'Author', width: 20 },
{ field: 'Price', name: 'Price', width: 30} //"field" matches to the JSON objects field
];
/*create a new grid:*/
var bookGrid = dijit.byId('gridS');
if (bookGrid == null) { //Only create a grid if there grid already created
var grid = new dojox.grid.DataGrid({
id: 'gridS',
store: dataStore,
structure: gridStructure,
rowSelector: '30px',
height: '300px'
},
"gridDivTag"); //The div tag that is used to place the grid
/*Call startup() to render the grid*/
grid.startup();
}
else {
bookGrid._refresh();
bookGrid.setStore(dataStore); //Setting the new datastore after entering new data
}
}
</script>
</head>
<body>
<div>
<h1>Welcome to Book Management Section</h1>
<% //HtmlAnchor %>
<div id="gridDivTag"></div>
<br /><br />
<%: Html.ActionLink("Add New", "Create") %>
<%: Html.ActionLink("Ajax Call", "Ajax") %>
</div>
</body>
</html>
[/sourcecode]
11. Adding AJAX View
I wanna create this view just to demonstrate AJAX operations with ASP.NET MVC3
[sourcecode language="csharp"]
<%@ Page Language="C#" Inherits="System.Web.Mvc.ViewPage<dynamic>" %>
<!DOCTYPE html>
<html>
<head id="Head1" runat="server">
<title>Ajax</title>
<style type="text/css">
@import "../../Scripts/dojo/dijit/themes/dijit.css";
@import "../../Scripts/dojo/dojox/grid/resources/Grid.css";
@import "../../Scripts/dojo/dojox/grid/resources/tundraGrid.css";
@import "../../Scripts/dojo/dijit/themes/tundra/tundra.css";
.style1
{
width: 134px;
}
</style>
<script type="text/javascript" src="../../Scripts/dojo/dojo/dojo.js" djconfig="isDebug:false, debugAtAllCosts:false"></script>
<script src="../../Scripts/dojo/dijit/dijit.js" type="text/javascript"></script>
<script language="javascript" type="text/javascript">
dojo.require("dojox.grid.DataGrid");
dojo.require("dojo.data.ItemFileWriteStore");
dojo.ready(function () {
DisplayAll();
});
function book() {
this.Name = dojo.byId("name").value;
this.Author = dojo.byId("author").value;
this.Price = dojo.byId("price").value;
}
function addBook_post() {
var bookObj = new book();
var xhrArgs = {
url: "../Book/Create_AJAX",
headers: { //Adding the request headers
"Content-Type": "application/json; charset=utf-8" // This is important to model bind to the server
},
postData: dojo.toJson(bookObj, true), //Converting the object in to Json to be sent the action method
handleAs: "json",
load: function (data) {
DisplayAll();
},
error: function (error) {
alert('error');
}
}
dojo.xhrPost(xhrArgs);
}
function DisplayAll() {
var that = this;
// The parameters to pass to xhrGet, the url, how to handle it, and the callbacks.
var xhrArgs = {
url: "../Book/GetJSON",
handleAs: "json",
preventCache: true,
load: function (data, ioargs) {
that.PopulateGrid(data); //This will populate the grid
},
error: function (error, ioargs) {
alert(ioargs.xhr.status);
}
}
// Call the asynchronous xhrGet
dojo.xhrGet(xhrArgs);
}
function PopulateGrid(store) {
var jsonString = "{identifier: \"Id\", items: " + dojo.toJson(store) + "}"; //Creates the Json data that supports the grid structure. The identifier value should be unique or errors will be thrown
var dataStore = new dojo.data.ItemFileReadStore({ data: dojo.fromJson(jsonString) }); //Converts it back to an object and set it as the store
/*set up layout of the grid that will be columns*/
var gridStructure = [
{ field: 'Id', name: 'Book Id', styles: 'text-align: center;', width: 20 },
{ field: 'Name', name: 'Name', width: 20 },
{ field: 'Author', name: 'Author', width: 20 },
{ field: 'Price', name: 'Price', width: 30} //"field" matches to the JSON objects field
];
/*create a new grid:*/
var bookGrid = dijit.byId('gridS');
if (bookGrid == null) { //Only create a grid if there grid already created
var grid = new dojox.grid.DataGrid({
id: 'gridS',
store: dataStore,
structure: gridStructure,
rowSelector: '30px',
height: '300px'
},
"gridDivTag"); //The div tag that is used to place the grid
/*Call startup() to render the grid*/
grid.startup();
}
else {
bookGrid._refresh();
bookGrid.setStore(dataStore); //Setting the new datastore after entering new data
}
}
</script>
</head>
<body >
<form id="form1" runat="server">
<div>
<h1>Welcome to Book Management Section</h1>
<div id="gridDivTag"></div>
<br /><br />
<table style="width: 400px;">
<caption>
Add New Book</caption>
<tr>
<td>
Name</td>
<td>
<input id="name" type="text" />
</td>
</tr>
<tr>
<td>
Author</td>
<td>
<input id="author" type="text" />
</td>
</tr>
<tr>
<td>
Price</td>
<td>
<input id="price" type="text" />
</td>
</tr>
<tr>
<td>
</td>
<td>
<input id="add_post" type="submit" value="Add Via Post" onclick="addBook_post()" />
</td>
</tr>
</table>
<br /><br />
<%: Html.ActionLink("Add New", "Create") %> <%: Html.ActionLink("Ajax Call", "Ajax") %>
</div>
</form>
</body>
</html>
[/sourcecode]
Sample testing links
http://localhost:3616/
http://localhost:3616/Book/Create
http://localhost:3616/Book/Ajax
http://localhost:3616/Book/GetData/1
http://localhost:3616/Book/GetJSON
Obviously port number may change according to your environment.
 ASP.NET MVC3[/caption]
Welcome Back, today we gonna build a simple MVC application using ASP.net MVC3 template. The tutorial does not intend to teach you ASP.net MVC3 framework. There are so many resources on the internet that might help you getting started with this technology. So we focus on building a simple application using models, views, controllers, filters and other ASP.net specific things. Remember MVC is a design pattern and it can also be implemented in other programing languages like PHP.
Final result

Download Project
1. Creating New Project


2. Folder Structure

3. Changing the default controller.
You can change the default controller in Global.asax file by specifying the controller name and action method.

4. Adding Dojo files
We are using Dojo data grid for displaying data records. Therefore please download Dojo latest version and include them in Scripts folder.
5. Creating Book Modal
Right click on Models -> Add -> Class
Book.cs
[sourcecode language="csharp"]
using System;
using System.Collections.Generic;
using System.Linq;
using System.Web;
using System.ComponentModel.DataAnnotations;
namespace BooksApp.Models
{
public class Book
{
public int Id { get; set; }
[Required]
public string Name { get; set; }
[Required]
public string Author { get; set; }
[Required]
public float Price { get; set; }
}
}
[/sourcecode]
6. Creating BookFacade class
For a real application database operations can be placed in this class. For the sake of simplicity we omit mapping entity to database.
Right click on Models -> Add -> Class
BookFacade.cs
[sourcecode language="csharp"]
using System;
using System.Collections.Generic;
using System.Linq;
using System.Web;
using BooksApp.Models;
namespace BooksApp.Facade
{
public class BookFacade
{
public static List<Book> bookList { get; set; }
public static List<Book> GetBookList()
{
if (bookList == null)
{
bookList = new List<Book>();
for (int i = 0; i < 10; i++)
{
bookList.Add(new Book {Id = i, Name = "Book " + i, Author = "Author " + i, Price = i * 20 });
}
}
return bookList;
}
public static Book FindBook(int id)
{
var bookList = GetBookList();
return bookList.Find(x => x.Id == id);
}
public static void Add(Book book)
{
var bookList = GetBookList();
book.Id = bookList.Max(x => x.Id) + 1;
bookList.Add(book);
}
public static void Delete(int id)
{
var bookList = GetBookList();
Book book = bookList.Find(x => x.Id == id);
bookList.Remove(book);
}
}
}
[/sourcecode]
7. Creating BookController
Right click on Controllers-> Add -> Controller
BookController
[sourcecode language="csharp"]
using System;
using System.Collections.Generic;
using System.Linq;
using System.Web;
using System.Web.Mvc;
using BooksApp.Models;
using BooksApp.Facade;
using BooksApp.Filters;
namespace BooksApp.Controllers
{
public class BookController : Controller
{
//
// GET: /Book/
public ActionResult Index()
{
return View();
}
public ActionResult Create()
{
return View();
}
[AcceptVerbs(HttpVerbs.Post)]
public ActionResult Create(Book book)
{
if (book.Name.Length < 5)
{
ModelState.AddModelError("Book name", "Book name should have five or more characters.");
}
if (!ModelState.IsValid)
{
return View("Create",book);
}
BookFacade.Add(book);
return RedirectToAction("Index");
}
public ActionResult GetData(int id)
{
Book book = BookFacade.FindBook(id);
return View(book);
}
[RightChecker(AllowedBookIds = "5,6,7")]
public ActionResult Delete(int id)
{
Book book = BookFacade.FindBook(id);
if (book != null)
{
BookFacade.Delete(id);
}
return RedirectToAction("Index");
}
/////////////////////////AJAX/////////////////////////////
public ActionResult GetJSON()
{
return Json(BookFacade.GetBookList(), JsonRequestBehavior.AllowGet);
}
public ActionResult Ajax()
{
return View();
}
[AcceptVerbs(HttpVerbs.Post)]
public ActionResult Create_AJAX(Book book)
{
BookFacade.Add(book);
return new EmptyResult();
}
}
}
[/sourcecode]
Adding views
8. Adding Create View

[sourcecode anguage="csharp"]
<%@ Page Language="C#" Inherits="System.Web.Mvc.ViewPage<BooksApp.Models.Book>" %>
<!DOCTYPE html>
<html>
<head runat="server">
<title>Create</title>
</head>
<body>
<script src="<%: Url.Content("~/Scripts/jquery-1.5.1.min.js") %>" type="text/javascript"></script>
<script src="<%: Url.Content("~/Scripts/jquery.validate.min.js") %>" type="text/javascript"></script>
<script src="<%: Url.Content("~/Scripts/jquery.validate.unobtrusive.min.js") %>" type="text/javascript"></script>
<% using (Html.BeginForm("Create","Book")) { %>
<%: Html.ValidationSummary(true) %>
<fieldset>
<legend>Book</legend>
<div>
<%: Html.LabelFor(model => model.Name) %>
</div>
<div>
<%: Html.EditorFor(model => model.Name) %>
<%: Html.ValidationMessageFor(model => model.Name) %>
</div>
<div>
<%: Html.LabelFor(model => model.Author) %>
</div>
<div>
<%: Html.EditorFor(model => model.Author) %>
<%: Html.ValidationMessageFor(model => model.Author) %>
</div>
<div>
<%: Html.LabelFor(model => model.Price) %>
</div>
<div>
<%: Html.EditorFor(model => model.Price)%>
<%: Html.ValidationMessageFor(model => model.Price)%>
</div>
<p>
<input type="submit" value="Create" />
</p>
</fieldset>
<% } %>
<div>
<%: Html.ActionLink("Back to List", "Index") %>
</div>
</body>
</html>
[/sourcecode]
9. Adding GetData View

[sourcecode language="csharp"]
<%@ Page Language="C#" Inherits="System.Web.Mvc.ViewPage<BooksApp.Models.Book>" %>
<!DOCTYPE html>
<html>
<head runat="server">
<title>Book Details</title>
</head>
<body>
<fieldset>
<legend>Book</legend>
<div>Name</div>
<div>
<%: Html.DisplayFor(model => model.Name) %>
</div>
<div>Author</div>
<div>
<%: Html.DisplayFor(model => model.Author) %>
</div>
<div>Price</div>
<div>
<%: Html.DisplayFor(model => model.Price) %>
</div>
</fieldset>
<p>
<%: Html.ActionLink("Edit", "Edit", new { id=Model.Id }) %> |
<%: Html.ActionLink("Back to List", "Index") %>
</p>
</body>
</html>
[/sourcecode]
10. Adding Index View
[sourcecode language="csharp"]
<%@ Page Language="C#" Inherits="System.Web.Mvc.ViewPage<dynamic>" %>
<!DOCTYPE html>
<html>
<head runat="server">
<title>Index</title>
<style type="text/css">
@import "../../Scripts/dojo/dijit/themes/dijit.css";
@import "../../Scripts/dojo/dojox/grid/resources/Grid.css";
@import "../../Scripts/dojo/dojox/grid/resources/tundraGrid.css";
@import "../../Scripts/dojo/dijit/themes/tundra/tundra.css";
</style>
<script type="text/javascript" src="../../Scripts/dojo/dojo/dojo.js"
djconfig="isDebug:false, debugAtAllCosts:false"></script>
<script src="../../Scripts/dojo/dijit/dijit.js" type="text/javascript"></script>
<script language="javascript" type="text/javascript">
dojo.require("dojox.grid.DataGrid");
dojo.require("dojo.data.ItemFileWriteStore");
dojo.ready(function () {
DisplayAll();
});
function DisplayAll() {
var that = this;
// The parameters to pass to xhrGet, the url, how to handle it, and the callbacks.
var xhrArgs = {
url: "../Book/GetJSON",
handleAs: "json",
preventCache: true,
load: function (data, ioargs) {
that.PopulateGrid(data); //This will populate the grid
},
error: function (error, ioargs) {
alert(ioargs.xhr.status);
}
}
// Call the asynchronous xhrGet
dojo.xhrGet(xhrArgs);
}
function PopulateGrid(store) {
var jsonString = "{identifier: \"Id\", items: " + dojo.toJson(store) + "}"; //Creates the Json data that supports the grid structure. The identifier value should be unique or errors will be thrown
var dataStore = new dojo.data.ItemFileReadStore({ data: dojo.fromJson(jsonString) }); //Converts it back to an object and set it as the store
/*set up layout of the grid that will be columns*/
var gridStructure = [
{ field: 'Id', name: 'Book Id', styles: 'text-align: center;', width: 20 },
{ field: 'Name', name: 'Name', width: 20 },
{ field: 'Author', name: 'Author', width: 20 },
{ field: 'Price', name: 'Price', width: 30} //"field" matches to the JSON objects field
];
/*create a new grid:*/
var bookGrid = dijit.byId('gridS');
if (bookGrid == null) { //Only create a grid if there grid already created
var grid = new dojox.grid.DataGrid({
id: 'gridS',
store: dataStore,
structure: gridStructure,
rowSelector: '30px',
height: '300px'
},
"gridDivTag"); //The div tag that is used to place the grid
/*Call startup() to render the grid*/
grid.startup();
}
else {
bookGrid._refresh();
bookGrid.setStore(dataStore); //Setting the new datastore after entering new data
}
}
</script>
</head>
<body>
<div>
<h1>Welcome to Book Management Section</h1>
<% //HtmlAnchor %>
<div id="gridDivTag"></div>
<br /><br />
<%: Html.ActionLink("Add New", "Create") %>
<%: Html.ActionLink("Ajax Call", "Ajax") %>
</div>
</body>
</html>
[/sourcecode]
11. Adding AJAX View
I wanna create this view just to demonstrate AJAX operations with ASP.NET MVC3
[sourcecode language="csharp"]
<%@ Page Language="C#" Inherits="System.Web.Mvc.ViewPage<dynamic>" %>
<!DOCTYPE html>
<html>
<head id="Head1" runat="server">
<title>Ajax</title>
<style type="text/css">
@import "../../Scripts/dojo/dijit/themes/dijit.css";
@import "../../Scripts/dojo/dojox/grid/resources/Grid.css";
@import "../../Scripts/dojo/dojox/grid/resources/tundraGrid.css";
@import "../../Scripts/dojo/dijit/themes/tundra/tundra.css";
.style1
{
width: 134px;
}
</style>
<script type="text/javascript" src="../../Scripts/dojo/dojo/dojo.js" djconfig="isDebug:false, debugAtAllCosts:false"></script>
<script src="../../Scripts/dojo/dijit/dijit.js" type="text/javascript"></script>
<script language="javascript" type="text/javascript">
dojo.require("dojox.grid.DataGrid");
dojo.require("dojo.data.ItemFileWriteStore");
dojo.ready(function () {
DisplayAll();
});
function book() {
this.Name = dojo.byId("name").value;
this.Author = dojo.byId("author").value;
this.Price = dojo.byId("price").value;
}
function addBook_post() {
var bookObj = new book();
var xhrArgs = {
url: "../Book/Create_AJAX",
headers: { //Adding the request headers
"Content-Type": "application/json; charset=utf-8" // This is important to model bind to the server
},
postData: dojo.toJson(bookObj, true), //Converting the object in to Json to be sent the action method
handleAs: "json",
load: function (data) {
DisplayAll();
},
error: function (error) {
alert('error');
}
}
dojo.xhrPost(xhrArgs);
}
function DisplayAll() {
var that = this;
// The parameters to pass to xhrGet, the url, how to handle it, and the callbacks.
var xhrArgs = {
url: "../Book/GetJSON",
handleAs: "json",
preventCache: true,
load: function (data, ioargs) {
that.PopulateGrid(data); //This will populate the grid
},
error: function (error, ioargs) {
alert(ioargs.xhr.status);
}
}
// Call the asynchronous xhrGet
dojo.xhrGet(xhrArgs);
}
function PopulateGrid(store) {
var jsonString = "{identifier: \"Id\", items: " + dojo.toJson(store) + "}"; //Creates the Json data that supports the grid structure. The identifier value should be unique or errors will be thrown
var dataStore = new dojo.data.ItemFileReadStore({ data: dojo.fromJson(jsonString) }); //Converts it back to an object and set it as the store
/*set up layout of the grid that will be columns*/
var gridStructure = [
{ field: 'Id', name: 'Book Id', styles: 'text-align: center;', width: 20 },
{ field: 'Name', name: 'Name', width: 20 },
{ field: 'Author', name: 'Author', width: 20 },
{ field: 'Price', name: 'Price', width: 30} //"field" matches to the JSON objects field
];
/*create a new grid:*/
var bookGrid = dijit.byId('gridS');
if (bookGrid == null) { //Only create a grid if there grid already created
var grid = new dojox.grid.DataGrid({
id: 'gridS',
store: dataStore,
structure: gridStructure,
rowSelector: '30px',
height: '300px'
},
"gridDivTag"); //The div tag that is used to place the grid
/*Call startup() to render the grid*/
grid.startup();
}
else {
bookGrid._refresh();
bookGrid.setStore(dataStore); //Setting the new datastore after entering new data
}
}
</script>
</head>
<body >
<form id="form1" runat="server">
<div>
<h1>Welcome to Book Management Section</h1>
<div id="gridDivTag"></div>
<br /><br />
<table style="width: 400px;">
<caption>
Add New Book</caption>
<tr>
<td>
Name</td>
<td>
<input id="name" type="text" />
</td>
</tr>
<tr>
<td>
Author</td>
<td>
<input id="author" type="text" />
</td>
</tr>
<tr>
<td>
Price</td>
<td>
<input id="price" type="text" />
</td>
</tr>
<tr>
<td>
</td>
<td>
<input id="add_post" type="submit" value="Add Via Post" onclick="addBook_post()" />
</td>
</tr>
</table>
<br /><br />
<%: Html.ActionLink("Add New", "Create") %> <%: Html.ActionLink("Ajax Call", "Ajax") %>
</div>
</form>
</body>
</html>
[/sourcecode]
Sample testing links
http://localhost:3616/
http://localhost:3616/Book/Create
http://localhost:3616/Book/Ajax
http://localhost:3616/Book/GetData/1
http://localhost:3616/Book/GetJSON
Obviously port number may change according to your environment.
Subscribe to:
Posts (Atom)
-
Today we are going to build another restful web service in eclipse using gson library. When client makes a request, the application queries ...
-
To import Excel data, first you need to have a Excel reader. It should be accurate enough to interpret Excel data as expected. There 's ...

