Using Session Bean in JSP differs from the usage in servlets. We can inject session bean in servlets or in another session bean. But in JSP we can not use EJB in the same way. Most common approach would be a JNDI lookup to find the required bean.
First add a reference in deployment descriptor to the session bean.
[sourcecode language="xml"]
<ejb-local-ref>
<ejb-ref-name>AccountTypeFacadeRef</ejb-ref-name>
<ejb-ref-type>Session</ejb-ref-type>
<local>com.my.ejb.AccountTypeFacade</local>
<ejb-link>BankApp-ejb.jar#AccountTypeFacade</ejb-link>
</ejb-local-ref>
[/sourcecode]
is optional.
In JSP use JNDI lookup to find the resource.
[sourcecode language="xml"]
<%
String prefix = "java:comp/env/";
String ejbRefName = "AccountTypeFacadeRef";
String jndiUrl = prefix + ejbRefName;
javax.naming.Context ctx = new javax.naming.InitialContext();
AccountTypeFacade atf = ( AccountTypeFacade ) ctx.lookup( jndiUrl );
List<AccountType> accountTypeList = atf.findAll();
%>
[/sourcecode]
Saturday, November 9, 2013

Wednesday, October 30, 2013
Swing File Chooser Demo
[caption id="attachment_940" align="aligncenter" width="264"] Swing File Chooser[/caption]
[sourcecode language="java"]
package main;
import java.awt.BorderLayout;
import java.awt.Insets;
import java.awt.event.ActionEvent;
import java.awt.event.ActionListener;
import java.io.File;
import javax.swing.JButton;
import javax.swing.JComponent;
import javax.swing.JDialog;
import javax.swing.JFileChooser;
import javax.swing.JFrame;
import javax.swing.JPanel;
import javax.swing.JScrollPane;
import javax.swing.JTextArea;
public class SwingFileChooser extends JPanel implements ActionListener{
private static final String newLine = "\n";
private JButton openButton,saveButton;
private JTextArea log;
private JFileChooser fc;
public SwingFileChooser(){
super(new BorderLayout());
initComponents();
}
private void initComponents(){
log = new JTextArea();
log.setMargin(new Insets(5, 5, 5, 5));
log.setEditable(false);
JScrollPane jsp = new JScrollPane(log);
fc = new JFileChooser();
fc.setFileSelectionMode(JFileChooser.FILES_AND_DIRECTORIES);
openButton = new JButton("Open File");
openButton.addActionListener(this);
saveButton = new JButton("Save File");
saveButton.addActionListener(this);
JPanel buttonPanel = new JPanel();
buttonPanel.add(openButton);
buttonPanel.add(saveButton);
add(buttonPanel,BorderLayout.NORTH);
add(jsp,BorderLayout.CENTER);
}
@Override
public void actionPerformed(ActionEvent e) {
if(e.getSource() == openButton){
int returnVal = fc.showOpenDialog(this);
if(returnVal == JFileChooser.APPROVE_OPTION){
File file = fc.getSelectedFile();
log.append("Opening " + file.getName() + newLine);
}else{
log.append("cancelled file opening" + newLine);
}
log.setCaretPosition(log.getDocument().getLength());
}else if(e.getSource() == saveButton){
int returnVal = fc.showSaveDialog(this);
if(returnVal == JFileChooser.APPROVE_OPTION){
File file = fc.getSelectedFile();
log.append("Saving " + file.getName() + newLine);
}else{
log.append("cancelled file saving" + newLine);
}
log.setCaretPosition(log.getDocument().getLength());
}
}
private static void createGUI(){
JFrame.setDefaultLookAndFeelDecorated(true);
JDialog.setDefaultLookAndFeelDecorated(true);
JFrame frame = new JFrame("SwingFileChooser");
frame.setDefaultCloseOperation(JFrame.EXIT_ON_CLOSE);
JComponent newContentPane = new SwingFileChooser();
newContentPane.setOpaque(true);
frame.setContentPane(newContentPane);
frame.pack();
frame.setVisible(true);
}
public static void main(String[] args) {
javax.swing.SwingUtilities.invokeLater(new Runnable() {
@Override
public void run() {
createGUI();
}
});
}
}
[/sourcecode]
 Swing File Chooser[/caption]
[sourcecode language="java"]
package main;
import java.awt.BorderLayout;
import java.awt.Insets;
import java.awt.event.ActionEvent;
import java.awt.event.ActionListener;
import java.io.File;
import javax.swing.JButton;
import javax.swing.JComponent;
import javax.swing.JDialog;
import javax.swing.JFileChooser;
import javax.swing.JFrame;
import javax.swing.JPanel;
import javax.swing.JScrollPane;
import javax.swing.JTextArea;
public class SwingFileChooser extends JPanel implements ActionListener{
private static final String newLine = "\n";
private JButton openButton,saveButton;
private JTextArea log;
private JFileChooser fc;
public SwingFileChooser(){
super(new BorderLayout());
initComponents();
}
private void initComponents(){
log = new JTextArea();
log.setMargin(new Insets(5, 5, 5, 5));
log.setEditable(false);
JScrollPane jsp = new JScrollPane(log);
fc = new JFileChooser();
fc.setFileSelectionMode(JFileChooser.FILES_AND_DIRECTORIES);
openButton = new JButton("Open File");
openButton.addActionListener(this);
saveButton = new JButton("Save File");
saveButton.addActionListener(this);
JPanel buttonPanel = new JPanel();
buttonPanel.add(openButton);
buttonPanel.add(saveButton);
add(buttonPanel,BorderLayout.NORTH);
add(jsp,BorderLayout.CENTER);
}
@Override
public void actionPerformed(ActionEvent e) {
if(e.getSource() == openButton){
int returnVal = fc.showOpenDialog(this);
if(returnVal == JFileChooser.APPROVE_OPTION){
File file = fc.getSelectedFile();
log.append("Opening " + file.getName() + newLine);
}else{
log.append("cancelled file opening" + newLine);
}
log.setCaretPosition(log.getDocument().getLength());
}else if(e.getSource() == saveButton){
int returnVal = fc.showSaveDialog(this);
if(returnVal == JFileChooser.APPROVE_OPTION){
File file = fc.getSelectedFile();
log.append("Saving " + file.getName() + newLine);
}else{
log.append("cancelled file saving" + newLine);
}
log.setCaretPosition(log.getDocument().getLength());
}
}
private static void createGUI(){
JFrame.setDefaultLookAndFeelDecorated(true);
JDialog.setDefaultLookAndFeelDecorated(true);
JFrame frame = new JFrame("SwingFileChooser");
frame.setDefaultCloseOperation(JFrame.EXIT_ON_CLOSE);
JComponent newContentPane = new SwingFileChooser();
newContentPane.setOpaque(true);
frame.setContentPane(newContentPane);
frame.pack();
frame.setVisible(true);
}
public static void main(String[] args) {
javax.swing.SwingUtilities.invokeLater(new Runnable() {
@Override
public void run() {
createGUI();
}
});
}
}
[/sourcecode]
Friday, October 25, 2013
Monday, October 7, 2013
OpenSource Directions API Demo - YOURS Navigation API
[caption id="attachment_935" align="aligncenter" width="621"] YOURS API Demo[/caption]
In this tutorial, I 'll introduce you to YOURS, an OpenSource directions API. There are few OpenSource directions APIs available such as MapQuest, GeoSmart, Nominatim in addition to YOURS. However in my opinion, YOURS is the best and a good alternative to Google Directions which is the most popular Directions provider obviously.
The flexibility of usage has given more power in YOURS over other APIs in the same family. MapQuest is nice but it is not working for many geographical locations of the world other than North America and Europe. Nominatim is poor in its functional level and has less support for geographical diversity.
According to YOURS doucmentation, the API provide following features.
This tutorial provides sample code for accessing the API in JavaScript. As JavaScript does not allow cross domain requests we 're using a proxy which accepts requests from client, forward it to the API and send back server response. The proxy is written in PHP using CURL which is more safe than file_get_contents() and similar content loading functions.
We are using OpenLayers map with a vector layer which is going get features from server response. The route is drawn on map using vector data.
The API also provides travelling time, distance and turn by turn directions.
Demo
client.html
[sourcecode language="html"]
<html>
<head>
<meta http-equiv="Content-Type" content="text/html; charset=utf-8">
<meta name="description" content="OpenSource Directions API Demo - YOURS Navigation API">
<title>OpenSource Directions API Demo</title>
<link rel="stylesheet" href="http://demos.site11.com/assets/css/style.css">
<script src="http://code.jquery.com/jquery-1.9.1.min.js"></script>
<script src="http://openlayers.org/api/OpenLayers.js"></script>
<script type="text/javascript">
var lon = 0;
var lat = 0;
var zoom = 0;
var wgs84 = new OpenLayers.Projection("EPSG:4326");
var mercator = new OpenLayers.Projection("EPSG:900913");
$(document).ready(function(){
layer = new OpenLayers.Layer.OSM("OSM");
geojson_layer = new OpenLayers.Layer.Vector("GeoJSON", {
styleMap: new OpenLayers.StyleMap({
strokeColor: "#F00",
projection: mercator
}),
strategies: [new OpenLayers.Strategy.Fixed()],
protocol: new OpenLayers.Protocol.HTTP({
url: 'proxy.php?flat=6.9344&flon=79.8428&tlat=7.2844590&tlon=80.637459&v=motorcar&fast=1&layer=mapnik',
format: new OpenLayers.Format.GeoJSON()
})
});
var options = {
div : "map",
projection : wgs84,
units: "dd",
numZoomLevels : 7
};
var map = new OpenLayers.Map(options);
map.addLayers([layer,geojson_layer]);
map.setCenter(new OpenLayers.LonLat(79.8428, 6.9344).transform(wgs84,mercator), 12);
//Get Directions
$.ajax({
type: 'GET',
dataType: 'json',
url: 'proxy.php?flat=6.9344&flon=79.8428&tlat=7.2844590&tlon=80.637459&v=motorcar&fast=1&layer=mapnik',
cache: false,
success: function(response){
$("#travel_time").html(response.properties.traveltime);
$("#distance").html(response.properties.distance + ' miles');
$("#directions").html(response.properties.description);
},error: function(){
}
});
});
</script>
<style type="text/css">
#map{
width: 800px;
height: 400px;
border: 2px solid black;
padding:0;
margin:0;
}
</style>
</head>
<body>
<div id="map" style="width: 700px; height: 300px;margin-bottom : 50px;" align="center"></div>
<b>Travel Time</b>
<div id="travel_time"></div>
<b>Distance</b>
<div id="distance"></div>
<b>Directions</b>
<div id="directions"></div>
</body>
</html>
[/sourcecode]
Proxy.php
[sourcecode language="php"]
<?php $flat = $_GET['flat']; $flon = $_GET['flon']; $tlat = $_GET['tlat']; $tlon = $_GET['tlon']; $v = $_GET['v']; $fast = $_GET['fast']; $layer = $_GET['layer']; $myURL = "http://www.yournavigation.org/api/1.0/gosmore.php?format=geojson&instructions=1&flat=".$flat."&flon=".$flon."&tlat=".$tlat."&tlon=".$tlon."&v=".$v."&fast=".$fast."&layer=".$layer; $curl = curl_init(); curl_setopt_array($curl, array( CURLOPT_RETURNTRANSFER => 1,
CURLOPT_URL => $myURL
));
$resp = curl_exec($curl);
curl_close($curl);
echo $resp;
?>
[/sourcecode]
 YOURS API Demo[/caption]
In this tutorial, I 'll introduce you to YOURS, an OpenSource directions API. There are few OpenSource directions APIs available such as MapQuest, GeoSmart, Nominatim in addition to YOURS. However in my opinion, YOURS is the best and a good alternative to Google Directions which is the most popular Directions provider obviously.
The flexibility of usage has given more power in YOURS over other APIs in the same family. MapQuest is nice but it is not working for many geographical locations of the world other than North America and Europe. Nominatim is poor in its functional level and has less support for geographical diversity.
According to YOURS doucmentation, the API provide following features.
- Generate fastest or shortest routes in different modes:
- using all available roads for Car, Bicycle and Pedestrians .
- using only national, regional or local cycle routes/networks for Bicycle.
- Unlimited via points (waypoints) to make complex routes.
- Drag and drop waypoints moving.
- Drag and drop waypoint ordering.
- Geolocation: Lookup street- and placenames to determine their coordinates.
- Reverse geolocation: Lookup coordinates to determing their street- and placenames.You can read other features in doucmentation.
Example URL
http://www.yournavigation.org/api/1.0/gosmore.php?format=kml&flat=52.215676&flon=5.963946&tlat=52.2573&tlon=6.1799&v=motorcar&fast=1&layer=mapnikThis tutorial provides sample code for accessing the API in JavaScript. As JavaScript does not allow cross domain requests we 're using a proxy which accepts requests from client, forward it to the API and send back server response. The proxy is written in PHP using CURL which is more safe than file_get_contents() and similar content loading functions.
We are using OpenLayers map with a vector layer which is going get features from server response. The route is drawn on map using vector data.
The API also provides travelling time, distance and turn by turn directions.
Demo
client.html
[sourcecode language="html"]
<html>
<head>
<meta http-equiv="Content-Type" content="text/html; charset=utf-8">
<meta name="description" content="OpenSource Directions API Demo - YOURS Navigation API">
<title>OpenSource Directions API Demo</title>
<link rel="stylesheet" href="http://demos.site11.com/assets/css/style.css">
<script src="http://code.jquery.com/jquery-1.9.1.min.js"></script>
<script src="http://openlayers.org/api/OpenLayers.js"></script>
<script type="text/javascript">
var lon = 0;
var lat = 0;
var zoom = 0;
var wgs84 = new OpenLayers.Projection("EPSG:4326");
var mercator = new OpenLayers.Projection("EPSG:900913");
$(document).ready(function(){
layer = new OpenLayers.Layer.OSM("OSM");
geojson_layer = new OpenLayers.Layer.Vector("GeoJSON", {
styleMap: new OpenLayers.StyleMap({
strokeColor: "#F00",
projection: mercator
}),
strategies: [new OpenLayers.Strategy.Fixed()],
protocol: new OpenLayers.Protocol.HTTP({
url: 'proxy.php?flat=6.9344&flon=79.8428&tlat=7.2844590&tlon=80.637459&v=motorcar&fast=1&layer=mapnik',
format: new OpenLayers.Format.GeoJSON()
})
});
var options = {
div : "map",
projection : wgs84,
units: "dd",
numZoomLevels : 7
};
var map = new OpenLayers.Map(options);
map.addLayers([layer,geojson_layer]);
map.setCenter(new OpenLayers.LonLat(79.8428, 6.9344).transform(wgs84,mercator), 12);
//Get Directions
$.ajax({
type: 'GET',
dataType: 'json',
url: 'proxy.php?flat=6.9344&flon=79.8428&tlat=7.2844590&tlon=80.637459&v=motorcar&fast=1&layer=mapnik',
cache: false,
success: function(response){
$("#travel_time").html(response.properties.traveltime);
$("#distance").html(response.properties.distance + ' miles');
$("#directions").html(response.properties.description);
},error: function(){
}
});
});
</script>
<style type="text/css">
#map{
width: 800px;
height: 400px;
border: 2px solid black;
padding:0;
margin:0;
}
</style>
</head>
<body>
<div id="map" style="width: 700px; height: 300px;margin-bottom : 50px;" align="center"></div>
<b>Travel Time</b>
<div id="travel_time"></div>
<b>Distance</b>
<div id="distance"></div>
<b>Directions</b>
<div id="directions"></div>
</body>
</html>
[/sourcecode]
Proxy.php
[sourcecode language="php"]
<?php $flat = $_GET['flat']; $flon = $_GET['flon']; $tlat = $_GET['tlat']; $tlon = $_GET['tlon']; $v = $_GET['v']; $fast = $_GET['fast']; $layer = $_GET['layer']; $myURL = "http://www.yournavigation.org/api/1.0/gosmore.php?format=geojson&instructions=1&flat=".$flat."&flon=".$flon."&tlat=".$tlat."&tlon=".$tlon."&v=".$v."&fast=".$fast."&layer=".$layer; $curl = curl_init(); curl_setopt_array($curl, array( CURLOPT_RETURNTRANSFER => 1,
CURLOPT_URL => $myURL
));
$resp = curl_exec($curl);
curl_close($curl);
echo $resp;
?>
[/sourcecode]
Saturday, October 5, 2013
How to store an array in localStorage
This tutorial assumes that you are already familiar with HTML5 localStorage.
Although HTML5 localStorage is very useful, its usage is restricted to key value mechanism. Key and value is stored in string format despite what we need. For an instance, though you can specify a boolean type (either true or false) as the value, it is stored as a string.
What if we need to store multiple items as the value for a certain key. This can be little bit tricky if you gonna place an array directly as the value. When we scratch the surface of localStorage basic principles this is not possible. However you can come up with your own solutions that might work for you.
This tutorial demonstrates a simple way of handling above problem using json. We gonna store array as a json string. So nothing new here.
First add jQuery library as we are using some jQuery functions.
[sourcecode language="javascript"]
<script type="text/javascript">
var favorites_str = localStorage.getItem('my_favorites');
if(favorites_str == null) {
favorites = [];
favorites.push({ "name":"keshi", "id":"6" });
} else{
favorites = JSON.parse(favorites_str);
favorites.push({ "name":"sara", "id":"6" });
}
localStorage.setItem('my_favorites',JSON.stringify(favorites));
</script>
[/sourcecode]
To verify that above script is functioning please copy and run below script. It will make things easy, if you put this code in a separate file.
[sourcecode language="javascript"]
<script type="text/javascript">
var data = localStorage.getItem('my_favorites');
if(data == null){
alert("0 favorites");
}else{
favorites = JSON.parse(data);
$.each(favorites, function(index,item){
alert(item.name);
});
}
</script>
[/sourcecode]
Although HTML5 localStorage is very useful, its usage is restricted to key value mechanism. Key and value is stored in string format despite what we need. For an instance, though you can specify a boolean type (either true or false) as the value, it is stored as a string.
What if we need to store multiple items as the value for a certain key. This can be little bit tricky if you gonna place an array directly as the value. When we scratch the surface of localStorage basic principles this is not possible. However you can come up with your own solutions that might work for you.
This tutorial demonstrates a simple way of handling above problem using json. We gonna store array as a json string. So nothing new here.
First add jQuery library as we are using some jQuery functions.
[sourcecode language="javascript"]
<script type="text/javascript">
var favorites_str = localStorage.getItem('my_favorites');
if(favorites_str == null) {
favorites = [];
favorites.push({ "name":"keshi", "id":"6" });
} else{
favorites = JSON.parse(favorites_str);
favorites.push({ "name":"sara", "id":"6" });
}
localStorage.setItem('my_favorites',JSON.stringify(favorites));
</script>
[/sourcecode]
To verify that above script is functioning please copy and run below script. It will make things easy, if you put this code in a separate file.
[sourcecode language="javascript"]
<script type="text/javascript">
var data = localStorage.getItem('my_favorites');
if(data == null){
alert("0 favorites");
}else{
favorites = JSON.parse(data);
$.each(favorites, function(index,item){
alert(item.name);
});
}
</script>
[/sourcecode]
Tuesday, October 1, 2013
OpenSource PHP Graph libraries
[caption id="attachment_930" align="alignnone" width="645"] PHP Graphs[/caption]
There are so many PHP graph projects which you can find on internet. At the time of writing this post, JpGraph, phpgraphlib and pChart should appear in top Google search results. In my experience, phpgraphlib is developer-friendly and easy to use whereas JpGraph is more robust than others. pChart seems to be little bit outdated though they have updated their project.
JpGraph
phpgraphlib
 PHP Graphs[/caption]
There are so many PHP graph projects which you can find on internet. At the time of writing this post, JpGraph, phpgraphlib and pChart should appear in top Google search results. In my experience, phpgraphlib is developer-friendly and easy to use whereas JpGraph is more robust than others. pChart seems to be little bit outdated though they have updated their project.
JpGraph
phpgraphlib
Sunday, September 29, 2013
Create Charts with jFreeChart
[caption id="attachment_924" align="aligncenter" width="377"] jFreeChart Demo[/caption]
This tutorial is all about creating graphs. There are several tools for generating graphs without any hassle. Programming a graph from scratch might little be tricky as it also deals with some graphics. Using a tool or library reduces the development time a lot. So we gonna use an OpenSource chart tool named jFreeChart for Java development.
Creating a graph with jFreeChart is just a matter of entering the required graph data and a little piece of code. Therefore, as the CodeZone4 norm I just go ahead with a 3D bar graph implementation using jFreeChart.
You can find source code for other types of graph on the internet.
First download required JARs from jFreeChart and add them in your project's classpath.
[sourcecode language="java"]
import org.jfree.chart.*;
import org.jfree.data.category.*;
import org.jfree.data.general.DefaultPieDataset;
import org.jfree.data.xy.*;
import org.jfree.data.*;
import org.jfree.chart.renderer.category.*;
import org.jfree.chart.plot.*;
import java.awt.*;
public class Main {
public static void main(String[] args) {
DefaultCategoryDataset dataset = new DefaultCategoryDataset();
dataset.setValue(3780, "A", "2008");
dataset.setValue(5000, "B", "2008");
dataset.setValue(6500, "A", "2009");
dataset.setValue(6000, "B", "2009");
dataset.setValue(9000, "A", "2010");
dataset.setValue(10000, "B", "2010");
JFreeChart chart = ChartFactory.createBarChart3D("Annual Income Analysis", "Year", "Income",
dataset, PlotOrientation.VERTICAL, true, true, false);
chart.setBackgroundPaint(Color.yellow);
chart.getTitle().setPaint(Color.blue);
CategoryPlot p = chart.getCategoryPlot();
p.setRangeGridlinePaint(Color.red);
ChartFrame frame1 = new ChartFrame("Income Data", chart);
frame1.setVisible(true);
frame1.setSize(300, 300);
}
}
[/sourcecode]
 jFreeChart Demo[/caption]
This tutorial is all about creating graphs. There are several tools for generating graphs without any hassle. Programming a graph from scratch might little be tricky as it also deals with some graphics. Using a tool or library reduces the development time a lot. So we gonna use an OpenSource chart tool named jFreeChart for Java development.
Creating a graph with jFreeChart is just a matter of entering the required graph data and a little piece of code. Therefore, as the CodeZone4 norm I just go ahead with a 3D bar graph implementation using jFreeChart.
You can find source code for other types of graph on the internet.
First download required JARs from jFreeChart and add them in your project's classpath.
[sourcecode language="java"]
import org.jfree.chart.*;
import org.jfree.data.category.*;
import org.jfree.data.general.DefaultPieDataset;
import org.jfree.data.xy.*;
import org.jfree.data.*;
import org.jfree.chart.renderer.category.*;
import org.jfree.chart.plot.*;
import java.awt.*;
public class Main {
public static void main(String[] args) {
DefaultCategoryDataset dataset = new DefaultCategoryDataset();
dataset.setValue(3780, "A", "2008");
dataset.setValue(5000, "B", "2008");
dataset.setValue(6500, "A", "2009");
dataset.setValue(6000, "B", "2009");
dataset.setValue(9000, "A", "2010");
dataset.setValue(10000, "B", "2010");
JFreeChart chart = ChartFactory.createBarChart3D("Annual Income Analysis", "Year", "Income",
dataset, PlotOrientation.VERTICAL, true, true, false);
chart.setBackgroundPaint(Color.yellow);
chart.getTitle().setPaint(Color.blue);
CategoryPlot p = chart.getCategoryPlot();
p.setRangeGridlinePaint(Color.red);
ChartFrame frame1 = new ChartFrame("Income Data", chart);
frame1.setVisible(true);
frame1.setSize(300, 300);
}
}
[/sourcecode]
Sunday, September 15, 2013
Develop Voice Applications with VoiceXML
[caption id="attachment_915" align="alignnone" width="645"] voice xml[/caption]
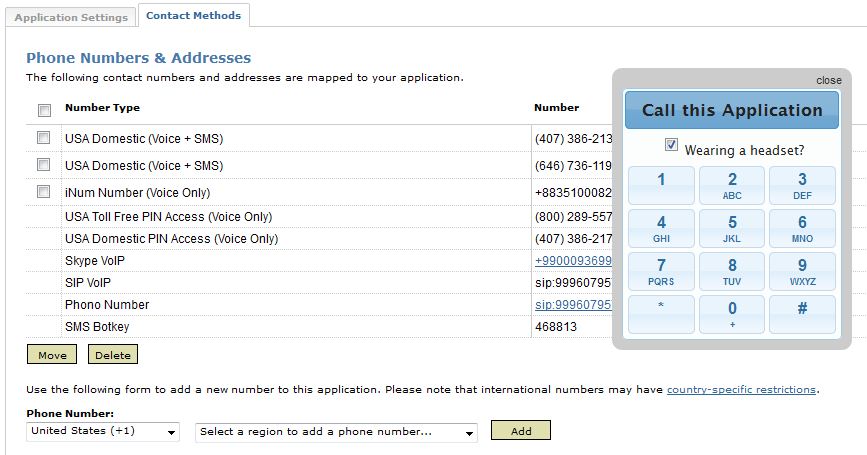
Web pages consist of HTML that is rendered into a visible page by a Web browser. Similarly, a voice application consists of XML (VoiceXML, CCXML, or CallXML) which becomes an interactive voice application when processed by the Voxeo Corporation VoiceCenter network. All you need to do is write the application's XML, map it to a phone number in the Voxeo Application Manager, and give it a call.
https://evolution.voxeo.com/
Sample vxml file
[sourcecode language="xml"]
<?xml version="1.0" encoding="UTF-8"?>
<vxml version="2.0" xmlns="http://www.w3.org/2001/vxml">
<form id="login">
<field name="phone_number" type="phone">
<prompt>Please say your complete phone number</prompt>
</field>
<field name="pin_code" type="digits">
<prompt>Please say your PIN code</prompt>
</field>
<block>
<submit next="http://www.example.com/servlet/login"
namelist="phone_number pin_code"/>
</block>
</form>
</vxml>
[/sourcecode]
Getting started with VoiceXML 2.0
 voice xml[/caption]
Web pages consist of HTML that is rendered into a visible page by a Web browser. Similarly, a voice application consists of XML (VoiceXML, CCXML, or CallXML) which becomes an interactive voice application when processed by the Voxeo Corporation VoiceCenter network. All you need to do is write the application's XML, map it to a phone number in the Voxeo Application Manager, and give it a call.
https://evolution.voxeo.com/
Sample vxml file
[sourcecode language="xml"]
<?xml version="1.0" encoding="UTF-8"?>
<vxml version="2.0" xmlns="http://www.w3.org/2001/vxml">
<form id="login">
<field name="phone_number" type="phone">
<prompt>Please say your complete phone number</prompt>
</field>
<field name="pin_code" type="digits">
<prompt>Please say your PIN code</prompt>
</field>
<block>
<submit next="http://www.example.com/servlet/login"
namelist="phone_number pin_code"/>
</block>
</form>
</vxml>
[/sourcecode]
Getting started with VoiceXML 2.0
Wednesday, September 11, 2013
Simple CRUD with MongoDB and PHP
[caption id="attachment_904" align="alignnone" width="645"] MongoDB[/caption]
Today we gonna make our hands dirty with some MongoDB stuff. MongoDB is a no-SQL type, schema-less database. Such databases can be very useful in situations where there is much more user-generated content. You should understand where you use MongoDB or Apache CouchDB rather than traditional relational databases. You may want to google for getting more details about MongoDB if you gonna try this tutorial as a newbie.
First download and install MongoDB in your environment.
As we are trying this tutorial in PHP, you should download mongo driver for PHP also.
Edit php.ini so that it can load mongo driver. Add this line(in Windows)
<pre>extension=php_mongo.dll</pre>
Now we are good to go.
Run MongoDB server and start Mongo shell.
First you need to create a database and add a database user. If this is the first time you 're going to create a database user, first you need to create an admin user. Read documentation for more details.
This tutorial is all about a simple CRUD application using MongoDB. In this application a blog post scenario is used for demonstrating CRUD operations. This scenario is very popular in MongoDB Hello World tutorials.
This tutorial does not include complete source code. You can download it here.
DB class
[sourcecode language="php"]
class DB {
const DBHOST = 'localhost';
const DBUSER = 'codezone4';
const DBPWD = '123';
const DBPORT = 27017;
const DBNAME = 'blog_db';
private static $instance;
public $connection;
public $databse;
private function __construct() {
$connection_string = sprintf('mongodb://%s:%s@%s:%d/%s', DB::DBUSER, DB::DBPWD, DB::DBHOST, DB::DBPORT, DB::DBNAME);
try {
$this->connection = new Mongo($connection_string);
$this->databse = $this->connection->selectDB(DB::DBNAME);
} catch (MongoConnectionException $e) {
throw $e;
}
}
static public function instantiate(){
if(!isset(self::$instance)){
$class = __CLASS__;
self::$instance = new $class;
}
return self::$instance;
}
public function get_collection($name){
return $this->databse->selectCollection($name);
}
}
[/sourcecode]
Add New Post
[sourcecode language="php"]
include 'db.class.php';
if(isset($_POST['add_post'])){
$title = $_POST['title'];
$content = $_POST['content'];
if(!empty($title) && !empty($content)){
$mongo = DB::instantiate();
$post_collection = $mongo->get_collection('posts');
$post = array(
'_id' => hash('sha1', time() . $title),
'title' => $title,
'content' => $content,
'created_on' => new MongoDate()
);
$post_id = $post_collection->insert($post,array('safe'=>TRUE));
header('Location:../dashboard.php');
}
}
[/sourcecode]
 MongoDB[/caption]
Today we gonna make our hands dirty with some MongoDB stuff. MongoDB is a no-SQL type, schema-less database. Such databases can be very useful in situations where there is much more user-generated content. You should understand where you use MongoDB or Apache CouchDB rather than traditional relational databases. You may want to google for getting more details about MongoDB if you gonna try this tutorial as a newbie.
First download and install MongoDB in your environment.
As we are trying this tutorial in PHP, you should download mongo driver for PHP also.
Edit php.ini so that it can load mongo driver. Add this line(in Windows)
<pre>extension=php_mongo.dll</pre>
Now we are good to go.
Run MongoDB server and start Mongo shell.
First you need to create a database and add a database user. If this is the first time you 're going to create a database user, first you need to create an admin user. Read documentation for more details.
This tutorial is all about a simple CRUD application using MongoDB. In this application a blog post scenario is used for demonstrating CRUD operations. This scenario is very popular in MongoDB Hello World tutorials.
This tutorial does not include complete source code. You can download it here.
DB class
[sourcecode language="php"]
class DB {
const DBHOST = 'localhost';
const DBUSER = 'codezone4';
const DBPWD = '123';
const DBPORT = 27017;
const DBNAME = 'blog_db';
private static $instance;
public $connection;
public $databse;
private function __construct() {
$connection_string = sprintf('mongodb://%s:%s@%s:%d/%s', DB::DBUSER, DB::DBPWD, DB::DBHOST, DB::DBPORT, DB::DBNAME);
try {
$this->connection = new Mongo($connection_string);
$this->databse = $this->connection->selectDB(DB::DBNAME);
} catch (MongoConnectionException $e) {
throw $e;
}
}
static public function instantiate(){
if(!isset(self::$instance)){
$class = __CLASS__;
self::$instance = new $class;
}
return self::$instance;
}
public function get_collection($name){
return $this->databse->selectCollection($name);
}
}
[/sourcecode]
Add New Post
[sourcecode language="php"]
include 'db.class.php';
if(isset($_POST['add_post'])){
$title = $_POST['title'];
$content = $_POST['content'];
if(!empty($title) && !empty($content)){
$mongo = DB::instantiate();
$post_collection = $mongo->get_collection('posts');
$post = array(
'_id' => hash('sha1', time() . $title),
'title' => $title,
'content' => $content,
'created_on' => new MongoDate()
);
$post_id = $post_collection->insert($post,array('safe'=>TRUE));
header('Location:../dashboard.php');
}
}
[/sourcecode]
Monday, September 9, 2013
jQueryMobile with Google Map
[caption id="attachment_900" align="alignnone" width="336"] jQueryMobile with Google Map[/caption]
Demo
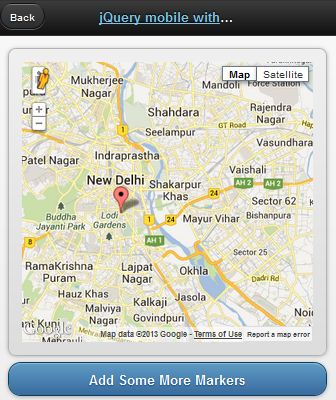
This demo is based on jQuery UI plugin for Google Maps.
[sourcecode language="javascript"]
<!doctype html>
<html lang="en">
<head>
<title>jQuery mobile with Google maps</title>
<link rel="stylesheet" href="http://code.jquery.com/mobile/1.2.0/jquery.mobile-1.2.0.min.css" />
<script src="http://code.jquery.com/jquery-1.8.2.min.js"></script>
<script src="http://code.jquery.com/mobile/1.2.0/jquery.mobile-1.2.0.min.js"></script>
<script type="text/javascript" src="http://maps.google.com/maps/api/js?v=3&sensor=false&language=en"> </script>
<script type="text/javascript" src="http://jquery-ui-map.googlecode.com/svn/trunk/ui/min/jquery.ui.map.min.js"></script>
<script type="text/javascript">
var colombo = new google.maps.LatLng(26.5727,73.8390);
var delhi = new google.maps.LatLng(28.6100,77.2300);
mobileDemo = { 'center': '28.6100,77.2300', 'zoom': 12 };
function initialize() {
$('#map_canvas').gmap({ 'center': mobileDemo.center, 'zoom': mobileDemo.zoom, 'disableDefaultUI':false });
$('#map_canvas').gmap('addMarker', { 'position': delhi } );
}
$(document).on("pageinit", "#basic-map", function() {
initialize();
});
$(document).on('click', '.add-markers', function(e) {
e.preventDefault();
$('#map_canvas').gmap('addMarker', { 'position': colombo } );
});
</script>
</head>
<body>
<div id="basic-map" data-role="page">
<div data-role="header">
<h1><a data-ajax="false" href="#">jQuery mobile with Google</a></h1>
<a data-rel="back">Back</a>
</div>
<div data-role="content">
<div style="padding:1em;">
<div id="map_canvas" style="height:350px;"></div>
</div>
<a href="#" data-role="button" data-theme="b">Add Some More Markers</a>
</div>
</div>
</body>
</html>
[/sourcecode]
 jQueryMobile with Google Map[/caption]
Demo
This demo is based on jQuery UI plugin for Google Maps.
[sourcecode language="javascript"]
<!doctype html>
<html lang="en">
<head>
<title>jQuery mobile with Google maps</title>
<link rel="stylesheet" href="http://code.jquery.com/mobile/1.2.0/jquery.mobile-1.2.0.min.css" />
<script src="http://code.jquery.com/jquery-1.8.2.min.js"></script>
<script src="http://code.jquery.com/mobile/1.2.0/jquery.mobile-1.2.0.min.js"></script>
<script type="text/javascript" src="http://maps.google.com/maps/api/js?v=3&sensor=false&language=en"> </script>
<script type="text/javascript" src="http://jquery-ui-map.googlecode.com/svn/trunk/ui/min/jquery.ui.map.min.js"></script>
<script type="text/javascript">
var colombo = new google.maps.LatLng(26.5727,73.8390);
var delhi = new google.maps.LatLng(28.6100,77.2300);
mobileDemo = { 'center': '28.6100,77.2300', 'zoom': 12 };
function initialize() {
$('#map_canvas').gmap({ 'center': mobileDemo.center, 'zoom': mobileDemo.zoom, 'disableDefaultUI':false });
$('#map_canvas').gmap('addMarker', { 'position': delhi } );
}
$(document).on("pageinit", "#basic-map", function() {
initialize();
});
$(document).on('click', '.add-markers', function(e) {
e.preventDefault();
$('#map_canvas').gmap('addMarker', { 'position': colombo } );
});
</script>
</head>
<body>
<div id="basic-map" data-role="page">
<div data-role="header">
<h1><a data-ajax="false" href="#">jQuery mobile with Google</a></h1>
<a data-rel="back">Back</a>
</div>
<div data-role="content">
<div style="padding:1em;">
<div id="map_canvas" style="height:350px;"></div>
</div>
<a href="#" data-role="button" data-theme="b">Add Some More Markers</a>
</div>
</div>
</body>
</html>
[/sourcecode]
Wednesday, September 4, 2013
Find Visitor's IP address in PHP
Relying on $_SERVER['REMOTE_ADDR'] to find your client's ip address is not always good. Looking for a wide solution?
Then use this function.
[sourcecode language="php"]
function get_ip() {
$ip = '';
if ($_SERVER['HTTP_CLIENT_IP'])
$ip = $_SERVER['HTTP_CLIENT_IP'];
else if($_SERVER['HTTP_X_FORWARDED_FOR'])
$ip = $_SERVER['HTTP_X_FORWARDED_FOR'];
else if($_SERVER['HTTP_X_FORWARDED'])
$ip = $_SERVER['HTTP_X_FORWARDED'];
else if($_SERVER['HTTP_FORWARDED_FOR'])
$ip = $_SERVER['HTTP_FORWARDED_FOR'];
else if($_SERVER['HTTP_FORWARDED'])
$ip = $_SERVER['HTTP_FORWARDED'];
else if($_SERVER['REMOTE_ADDR'])
$ip = $_SERVER['REMOTE_ADDR'];
else
$ip = '';
return $ip;
}
[/sourcecode]
Then use this function.
[sourcecode language="php"]
function get_ip() {
$ip = '';
if ($_SERVER['HTTP_CLIENT_IP'])
$ip = $_SERVER['HTTP_CLIENT_IP'];
else if($_SERVER['HTTP_X_FORWARDED_FOR'])
$ip = $_SERVER['HTTP_X_FORWARDED_FOR'];
else if($_SERVER['HTTP_X_FORWARDED'])
$ip = $_SERVER['HTTP_X_FORWARDED'];
else if($_SERVER['HTTP_FORWARDED_FOR'])
$ip = $_SERVER['HTTP_FORWARDED_FOR'];
else if($_SERVER['HTTP_FORWARDED'])
$ip = $_SERVER['HTTP_FORWARDED'];
else if($_SERVER['REMOTE_ADDR'])
$ip = $_SERVER['REMOTE_ADDR'];
else
$ip = '';
return $ip;
}
[/sourcecode]
Subscribe to:
Posts (Atom)
-
Today we are going to build another restful web service in eclipse using gson library. When client makes a request, the application queries ...
-
To import Excel data, first you need to have a Excel reader. It should be accurate enough to interpret Excel data as expected. There 's ...

